# 前言 [scode type="blue" size=""]因为是全网最新最全的美化记录,加之主题架构比较大,所以说不止于一个美化教程,共涉及到四个相关文章 [/scode] [post cid="578" cover="" size=""/] [post cid="587" cover="" size=""/] [post cid="581" cover="" size=""/] [post cid="544" cover="" size=""/] ## 关于 <div class="tip inlineBlock share">教程来源至网络,感谢各位大佬的教程贡献,文章末尾会引出原文链接</div> # 1.0 [hide] ## <code>自定义CSS</code> <div class="tip inlineBlock warning"><strong>自定义<code>CSS</code>丨放入后台-外观设置-开发者设置-自定义CSS</strong></div> ### 首页文章版式阴影化 [collapse status="false" title="首页文章版式阴影化"] ```css .panel{ box-shadow: 1px 1px 5px 5px rgba(255, 112, 173, 0.35); -moz-box-shadow: 1px 1px 5px 5px rgba(255, 112, 173, 0.35); } .panel:hover{ box-shadow: 1px 1px 5px 5px rgba(255, 112, 173, 0.35); -moz-box-shadow: 1px 1px 5px 5px rgba(255, 112, 173, 0.35); } .panel-small{ box-shadow: 1px 1px 5px 5px rgba(255, 112, 173, 0.35); -moz-box-shadow: 1px 1px 5px 5px rgba(255, 112, 173, 0.35); } .panel-small:hover{ box-shadow: 1px 1px 5px 5px rgba(255, 112, 173, 0.35); -moz-box-shadow: 1px 1px 5px 5px rgba(255, 112, 173, 0.35); } ``` [/collapse] ### 首页文章图片获取焦点放大 [collapse status="false" title="首页文章图片获取焦点放大"] ```css .item-thumb{ cursor: pointer; transition: all 0.6s; } .item-thumb:hover{ transform: scale(1.05); } .item-thumb-small{ cursor: pointer; transition: all 0.6s; } .item-thumb-small:hover{ transform: scale(1.05); } ``` [/collapse] ### 标签云整齐排列 [collapse status="false" title="标签云整齐排列"] ```css /*标签云*/ #tag_cloud-2 a { border-radius: 5px; width: 32%; } ``` [/collapse] ### 文章内打赏图标跳动 [collapse status="false" title="文章内打赏图标跳动"] ```css /*文章内打赏图标跳动*/ .btn-pay { animation: star 0.5s ease-in-out infinite alternate; } @keyframes star { from { transform: scale(1); } to { transform: scale(1.1); } } ``` [/collapse] ### 手机适配中不显示热门及标签云 [collapse status="false" title="手机适配中不显示热门及标签云"] 将以下代码添加至<code>后台-开发者设置-自定义CSS</code>。 ```css /*手机不显示*/ @media (max-width:767px) { #tabs-4,#tag_cloud-2 { display: none; } } ``` [/collapse] ### 文章标题居中 [collapse status="false" title="文章标题居中"] ```css /*文章标题居中*/ .panel h2{ text-align: center; } .panel-small h2{ text-align: center; } .panel-picture h3{ text-align: center; } .post-item-foot-icon{ text-align: center; } ``` [/collapse] ### 美化主页文章列表宽度 [collapse status="false" title="美化主页文章列表宽度"] ```css /* 非盒子模式页面宽度 */ .no-container #post-panel, .no-container .blog-posts { max-width: 90%; } ``` [/collapse] ### 粗体上色 [collapse status="false" title="粗体上色"] ```css /* 粗体上色 */ strong{ color: rgb(255, 153, 0); } ``` [/collapse] ### panel阴影 [collapse status="false" title="panel阴影"] ```css /*panel阴影*/ .panel{ box-shadow: 1px 1px 5px 5px rgba(255, 112, 173, 0.35); -moz-box-shadow: 1px 1px 5px 5px rgba(255, 112, 173, 0.35); } .panel:hover{ box-shadow: 1px 1px 5px 5px rgba(255, 112, 173, 0.35); -moz-box-shadow: 1px 1px 5px 5px rgba(255, 112, 173, 0.35); } .panel-small{ box-shadow: 1px 1px 5px 5px rgba(255, 112, 173, 0.35); -moz-box-shadow: 1px 1px 5px 5px rgba(255, 112, 173, 0.35); } .panel-small:hover{ box-shadow: 1px 1px 5px 5px rgba(255, 112, 173, 0.35); -moz-box-shadow: 1px 1px 5px 5px rgba(255, 112, 173, 0.35); } .app.container { box-shadow: 0 0 30px rgba(255, 112, 173, 0.35); } ``` [/collapse] ### 右侧栏气泡颜色加深 [collapse status="false" title="右侧栏气泡颜色加深"] ```css /* 右侧栏气泡颜色加深 */ div.post-tags>a,aside.asideBar .badge{background-color:#777} ``` [/collapse] ### 时光机圆形头像 [collapse status="false" title="时光机圆形头像"] ```css /* 时光机圆形头像 */ .img-square {border-radius: 50%;} .list-group-item .thumb-sm .img-square {border-radius: 5px;} ``` [/collapse] ### 美化网站右侧滚动条样式 [collapse status="false" title="美化网站右侧滚动条样式"] ```c's's /*定义滚动条高宽及背景 高宽分别对应横竖滚动条的尺寸*/ ::-webkit-scrollbar { width: 8px; height: 6px } /*定义滚动条轨道*/ ::-webkit-scrollbar-track { background-color: transparent; -webkit-border-radius: 2em; -moz-border-radius: 2em; border-radius: 2em } /*定义滑块 内阴影+圆角*/ ::-webkit-scrollbar-thumb { background-color: #30B07F; background-image: -webkit-linear-gradient(45deg,rgba(255,255,255,.4) 100%,transparent 100%,transparent 50%,rgba(255,255,255,.4) 50%,rgba(255,255,255,.4) 75%,transparent 75%,transparent); -webkit-border-radius: 2em; -moz-border-radius: 2em; border-radius: 2em } ``` [/collapse] =page= ## <code>自定义head</code> <div class="tip inlineBlock warning"><strong>自定义<code>head</code>丨放入后台-外观设置-开发者设置-自定义头部-head</strong></div> ### 给网站添加crisp在线客服插件 [collapse status="false" title="给网站添加crisp在线客服插件"] <li>注册crisp账户并添加网站:<span class="external-link"><a class="no-external-link" href="https://app.crisp.chat/initiate/signup/" target="_blank" style="cursor: url("/usr/plugins/HoerMouse/static/image/dew/link.cur"), pointer;">https://app.crisp.chat/initiate/signup/<svg xmlns="http://www.w3.org/2000/svg" width="16px" height="16px" viewBox="0 0 24 24" fill="none" stroke="currentColor" stroke-width="2" stroke-linecap="round" stroke-linejoin="round" class="feather feather-external-link"><path d="M18 13v6a2 2 0 0 1-2 2H5a2 2 0 0 1-2-2V8a2 2 0 0 1 2-2h6"></path><polyline points="15 3 21 3 21 9"></polyline><line x1="10" y1="14" x2="21" y2="3"></line></svg></a></span></li> <li>注册完成后,点击 <code>设置</code>-<code>网站设置</code>-<code>显示整合</code>-<code>HTML</code>,复制代码添加至后台主题设置 <code>自定义输出head 头部的HTML代码</code>即可</li> [/collapse] ### 网站背景添加海浪背景 [collapse status="false" title="网站背景添加海浪背景"] * 添加至后台主题设置-开发者设置-自定义CSS ```css /* 海浪背景CSS部分 */ #wavesDIV{position: fixed;bottom: 0;width: 100%;display:block;height:20vh;background-color:rgb(125,165,191);animation: move-out 2s cubic-bezier(0,.98,.97,1) forwards;} .waves { position:relative; width: 100%; height:15vh; margin-top:-15vh; min-height:100px; max-height:150px; } .parallax > use { animation: move-forever 25s cubic-bezier(.55, .5, .45, .5) infinite; } .parallax > use:nth-child(1) { animation-delay: -2s; animation-duration: 7s; } .parallax > use:nth-child(2) { animation-delay: -3s; animation-duration: 10s; } .parallax > use:nth-child(3) { animation-delay: -4s; animation-duration: 13s; } .parallax > use:nth-child(4) { animation-delay: -5s; animation-duration: 20s; } @keyframes move-forever { 0% { transform: translate3d(-90px, 0, 0); } 100% { transform: translate3d(85px, 0, 0); } } @keyframes move-out { 0% { transform: translateY(400%); } 100% { transform: translateY(0%); } } ``` * 添加至后台主题设置-开发者设置-自定义网站头部代码 ```html <div id="wavesDIV" style="display: block;"> <svg class="waves" xmlns="http://www.w3.org/2000/svg" xmlns:xlink="http://www.w3.org/1999/xlink" viewBox="0 24 150 28" preserveAspectRatio="none" shape-rendering="auto"> <defs> <path id="gentle-wave" d="M-160 44c30 0 58-18 88-18s 58 18 88 18 58-18 88-18 58 18 88 18 v44h-352z"></path> </defs> <g class="parallax"> <use xlink:href="#gentle-wave" x="48" y="-2" fill="rgba(125,165,191,0.3)"></use> <use xlink:href="#gentle-wave" x="48" y="3" fill="rgba(125,165,191,0.5)"></use> <use xlink:href="#gentle-wave" x="48" y="5" fill="rgba(125,165,191,0.7)"></use> <use xlink:href="#gentle-wave" x="48" y="12" fill="rgba(125,165,191,1)"></use> </g> </svg> </div> ``` [/collapse] ## <code>自定义body</code> <div class="tip inlineBlock warning"><strong>自定义<code>body</code>丨放入后台-外观设置-开发者设置-自定义尾部-body</strong></div> ### 全局彩色字 [collapse status="false" title="全局彩色字"] 转至[Dzの神奇小窝](https://www.ecy.pink/Code/colorfulJsCode.html) [tabs] [tab name="代码" active="true"] ```js function colorful(min,max){ var All = document.querySelectorAll('*'); All.forEach(function(item){ id1 = Math.floor(Math.random()*max)+min; id2 = Math.floor(Math.random()*max)+min; id3 = Math.floor(Math.random()*max)+min; item.style.color = "rgb("+id1+","+id2+","+id3+")"; item.style.textShadow = "0 0 2px rgb("+id1+","+id2+","+id3+")"; }); } ``` [/tab] [tab name="使用方法"] **基础用法** 1.在网页body标签前添加一个script标签 2.将代码复制进script标签 3.在代码后添加 `colorful(颜色最浅值,颜色最深值);` > 推荐值:colorful(100,115); > 4.如果页面有pjax,再加一句 `colorful(颜色最浅值,颜色最深值);`在回调函数里 **进阶用法(按推荐值示例)** 在代码中加入 ```js t = setTimeout(function(){ colorful(100,115); },600); ``` 在pjax回调函数中加入 ```js colorful(100,115); clearTimeout(t); ``` > 代码 `var All = document.querySelectorAll('*');`中的*号是Css选择器,*代表选择所有DOM,也可以改为#XXX,.XXX来选择特定的DOM元素,只让特定位置变色 [/tab] [/tabs] [/collapse] ### 右键自定义 [collapse status="false" title="右键自定义"] ```html <style type="text/css"> a {text-decoration: none;} div.usercm{background-repeat:no-repeat;background-position:center center;background-size:cover;background-color:#fff;font-size:13px!important;width:130px;-moz-box-shadow:1px 1px 3px rgba (0,0,0,.3);box-shadow:0px 0px 15px #333;position:absolute;display:none;z-index:10000;opacity:0.9; border-radius: 8px;} div.usercm ul{list-style-type:none;list-style-position:outside;margin:0px;padding:0px;display:block} div.usercm ul li{margin:0px;padding:0px;line-height:35px;} div.usercm ul li a{color:#666;padding:0 15px;display:block} div.usercm ul li a:hover{color:#fff;background:rgba(170,222,18,0.88)} div.usercm ul li a i{margin-right:10px} a.disabled{color:#c8c8c8!important;cursor:not-allowed} a.disabled:hover{background-color:rgba(255,11,11,0)!important} div.usercm{background:#fff !important;} </style> <div class="usercm" style="left: 199px; top: 5px; display: none;"> <ul> <li><a href="https://muyu.love/"><i class="fa fa-home fa-fw"></i><span>首页</span></a></li> <li><a href="javascript:void(0);" onclick="getSelect();"><i class="fa fa-copy fa-fw"></i><span>复制</span></a></li> <li><a href="javascript:void(0);" onclick="baiduSearch();"><i class="fa fa-search fa-fw"></i><span>搜索</span></a></li> <li><a href="javascript:history.go(1);"><i class="fa fa-arrow-right fa-fw"></i><span>前进</span></a></li> <li><a href="javascript:history.go(-1);"><i class="fa fa-arrow-left fa-fw"></i><span>后退</span></a></li> <li style="border-bottom:1px solid gray"><a href="javascript:window.location.reload();"><i class="fa fa-refresh fa-fw"></i><span>重载网页</span></a></li> <li><a href="https://muyu.love/links.html"><i class="fa fa-meh-o fa-fw"></i><span>和我当邻居</span></a></li> <li><a href="https://muyu.love/message.html"><i class="fa fa-pencil-square-o fa-fw"></i><span>给我留言吧</span></a></li> </ul> </div> <script type="text/javascript"> (function(a) { a.extend({ mouseMoveShow: function(b) { var d = 0, c = 0, h = 0, k = 0, e = 0, f = 0; a(window).mousemove(function(g) { d = a(window).width(); c = a(window).height(); h = g.clientX; k = g.clientY; e = g.pageX; f = g.pageY; h + a(b).width() >= d && (e = e - a(b).width() - 5); k + a(b).height() >= c && (f = f - a(b).height() - 5); a("html").on({ contextmenu: function(c) { 3 == c.which && a(b).css({ left: e, top: f }).show() }, click: function() { a(b).hide() } }) }) }, disabledContextMenu: function() { window.oncontextmenu = function() { return !1 } } }) })(jQuery); function getSelect() { "" == (window.getSelection ? window.getSelection() : document.selection.createRange().text) ? layer.msg("啊噢...你没还没选择文字呢!") : document.execCommand("Copy") } function baiduSearch() { var a = window.getSelection ? window.getSelection() : document.selection.createRange().text; "" == a ? layer.msg("啊噢...你没还没选择文字呢!") : window.open("https://www.baidu.com/s?wd=" + a) } $(function() { for (var a = navigator.userAgent, b = "Android;iPhone;SymbianOS;Windows Phone;iPad;iPod".split(";"), d = !0, c = 0; c < b.length; c++) if (0 < a.indexOf(b[c])) { d = !1; break } d && ($.mouseMoveShow(".usercm"), $.disabledContextMenu()) }); </script> ``` [/collapse] ### 万能的控制台 [collapse status="false" title="万能的控制台"] ```html <!--输出控制台--> <script type="text/javascript"> console.clear(); //清空控制台 console.log("\n %c Catalpa Blog 控制台--没什么可看的","color:#fff;background: linear-gradient(to right , #7A88FF, #d27aff);padding:5px;border-radius: 10px;"); //万能控制台,可写html代码 </script> ``` [/collapse] ### 博客背景添加冒泡动画 [collapse status="false" title="博客背景添加冒泡动画"] **设置** ```html id: '', //容器ID num: 100, // 个数 start_probability: 0.1, // 如果数量小于num,有这些几率添加一个新的 radius_min: 1, // 初始半径最小值 radius_max: 2, // 初始半径最大值 radius_add_min: .3, // 半径增加最小值 radius_add_max: .5, // 半径增加最大值 opacity_min: 0.3, // 初始透明度最小值 opacity_max: 0.5, // 初始透明度最大值 opacity_prev_min: .003, // 透明度递减值最小值 opacity_prev_max: .005, // 透明度递减值最大值 light_min: 40, // 颜色亮度最小值 light_max: 70, // 颜色亮度最大值 is_same_color: false, //泡泡颜色是否相同 background:"#f1f3f4" //背景颜色 ``` 复制这段内容并添加在前面,handsome主题可以在 开发者设置 自定义输出body 尾部的HTML代码中添加。 ```js <div id="bubble"></div><script>class BGBubble{constructor(i){this.defaultOpts={id:"",num:100,start_probability:.1,radius_min:1,radius_max:2,radius_add_min:.3,radius_add_max:.5,opacity_min:.3,opacity_max:.5,opacity_prev_min:.003,opacity_prev_max:.005,light_min:40,light_max:70,is_same_color:!1,background:"#f1f3f4"},"[object Object]"==Object.prototype.toString.call(i)?this.userOpts={...this.defaultOpts,...i}:this.userOpts={...this.defaultOpts,id:i},this.color=this.random(0,360),this.bubbleNum=[],this.requestAnimationFrame=window.requestAnimationFrame||window.mozRequestAnimationFrame||window.webkitRequestAnimationFrame||window.msRequestAnimationFrame,this.cancelAnimationFrame=window.cancelAnimationFrame||window.mozCancelAnimationFrame}random(i,t){return Math.random()*(t-i)+i}initBubble(i,t){const a=window.innerWidth,s=window.innerHeight,n=this.userOpts,e=this.random(n.light_min,n.light_max);this.bubble={x:this.random(0,a),y:this.random(0,s),radius:this.random(n.radius_min,n.radius_max),radiusChange:this.random(n.radius_add_min,n.radius_add_max),opacity:this.random(n.opacity_min,n.opacity_max),opacityChange:this.random(n.opacity_prev_min,n.opacity_prev_max),light:e,color:`hsl(${t?i:this.random(0,360)},100%,${e}%)`}}bubbling(i,t,a){!this.bubble&&this.initBubble(t,a);const s=this.bubble;i.fillStyle=s.color,i.globalAlpha=s.opacity,i.beginPath(),i.arc(s.x,s.y,s.radius,0,2*Math.PI,!0),i.closePath(),i.fill(),i.globalAlpha=1,s.opacity-=s.opacityChange,s.radius+=s.radiusChange,s.opacity<=0&&this.initBubble(t,a)}createCanvas(){this.canvas=document.createElement("canvas"),this.ctx=this.canvas.getContext("2d"),this.canvas.style.display="block",this.canvas.width=window.innerWidth,this.canvas.height=window.innerHeight,this.canvas.style.position="fixed",this.canvas.style.top="0",this.canvas.style.left="0",this.canvas.style.zIndex="-1",document.getElementById(this.userOpts.id).appendChild(this.canvas),window.onresize=(()=>{this.canvas.width=window.innerWidth,this.canvas.height=window.innerHeight})}start(){const i=window.innerWidth,t=window.innerHeight;this.color+=.1,this.ctx.fillStyle=this.defaultOpts.background,this.ctx.fillRect(0,0,i,t),this.bubbleNum.length<this.userOpts.num&&Math.random()<this.userOpts.start_probability&&this.bubbleNum.push(new BGBubble),this.bubbleNum.forEach(i=>i.bubbling(this.ctx,this.color,this.userOpts.is_same_color));const a=this.requestAnimationFrame;this.myReq=a(()=>this.start())}destory(){(0,this.cancelAnimationFrame)(this.myReq),window.onresize=null}}const bubbleDemo=new BGBubble("bubble");bubbleDemo.createCanvas(),bubbleDemo.start();</script> ``` [/collapse] ### 防调试 [collapse status="false" title="防调试"] 禁止右键-禁止F12-打开开发者工具自动跳转 (QQ游览器,火狐不支持跳转~!) 复制这段内容并添加在前面,handsome主题可以在 开发者设置 自定义输出body 尾部的HTML代码中添加。 ```html <!--防调试--> <script type="text/javascript"> $(document).ready(function () { document.oncontextmenu = function () { return false; } //document.onselectstart = function () { // return false; // } //document.oncopy = function () { //return false; // } document.onkeydown = function () { //f12 if (window.event && window.event.keyCode == 123) { event.keyCode = 0; event.returnValue = false; layer.msg("别看代码了=.=") return false; } //ctrl+u if (event.ctrlKey && window.event.keyCode == 85) { return false; } //ctrl+shift+i if ((event.ctrlKey) && (event.shiftKey) && (event.keyCode == 73)) { return false; } // Ctrl+S else if ((event.ctrlKey) && (event.keyCode == 83)) { return false; } }; }); </script> <!--<script> // 反调试函数,参数:开关,执行代码 function endebug(off, code) { if (!off) { ! function(e) { function n(e) { function n() { return u; } function o() { window.Firebug && window.Firebug.chrome && window.Firebug.chrome.isInitialized ? t("on") : (a = "off", console.log(d), console.clear(), t(a)); } function t(e) { u !== e && (u = e, "function" == typeof c.onchange && c.onchange(e)); } function r() { l || (l = !0, window.removeEventListener("resize", o), clearInterval(f)); } "function" == typeof e && (e = { onchange: e }); var i = (e = e || {}).delay || 500, c = {}; c.onchange = e.onchange; var a, d = new Image; d.__defineGetter__("id", function() { a = "on" }); var u = "unknown"; c.getStatus = n; var f = setInterval(o, i); window.addEventListener("resize", o); var l; return c.free = r, c; } var o = o || {}; o.create = n, "function" == typeof define ? (define.amd || define.cmd) && define(function() { return o }) : "undefined" != typeof module && module.exports ? module.exports = o : window.jdetects = o }(), jdetects.create(function(e) { var a = 0; var n = setInterval(function() { if ("on" == e) { setTimeout(function() { if (a == 0) { a = 1; setTimeout(code); } }, 200); } }, 100); }) } } endebug(false, function() { // 非法调试执行的代码(不要使用控制台输出的提醒) document.write("检测到非法调试,请关闭后刷新重试!"); }); </script>--> <script> //debug调试时跳转页面 var element = new Image(); Object.defineProperty(element,'id',{get:function(){window.location.href="https://muyu.love"}}); console.log(element); </script> ``` [/collapse] ### 五颜六色字体 [collapse status="false" title="五颜六色字体"] ```html <script> /*五颜六色字体*/ function sjcolor(){ var colorArr = ["#428BCA", "#AEDCAE", "#ECA9A7", "#DA99FF", "#FFB380", "#D9B999", "#3bca6e", "#f23232", "#834e75", "#23b7e5", "#f60"]; /*设置颜色*/ document.querySelectorAll("#aside > div > div.navi-wrap.scroll-y.scroll-hide > nav > ul > li > a > span").forEach(e => { e.style.color = colorArr[Math.floor(Math.random() * colorArr.length)]; }); document.querySelectorAll("#aside > div > div.navi-wrap.scroll-y.scroll-hide > nav > ul > li > ul > li > a > span").forEach(e => { e.style.color = colorArr[Math.floor(Math.random() * colorArr.length)]; }); document.querySelectorAll("#aside > div > div.navi-wrap.scroll-y.scroll-hide > nav > ul > li > ul > li > a").forEach(e => { e.style.color = colorArr[Math.floor(Math.random() * colorArr.length)]; }); document.querySelectorAll("#aside > div > div.navi-wrap.scroll-y.scroll-hide > nav > ul > li > ul > li > a > b").forEach(e => { e.style.backgroundColor = colorArr[Math.floor(Math.random() * colorArr.length)]; }); /*左侧导航字体颜色*/ document.querySelectorAll("#post-panel > div > div > div > div.panel-body > div.nav-tabs-alt > ul > li > a").forEach(e => { e.style.color = colorArr[Math.floor(Math.random() * colorArr.length)]; }); document.querySelectorAll("#post-panel > div > div > div > div").forEach(e => { e.style.color = colorArr[Math.floor(Math.random() * colorArr.length)]; }); document.querySelectorAll("#post-panel > div.blog-post > div > div.post-meta.wrapper-lg > h2 > a").forEach(e => { e.style.color = colorArr[Math.floor(Math.random() * colorArr.length)]; }); /*首页面板*/ document.querySelectorAll("#small_widgets > h1").forEach(e => { e.style.color = colorArr[Math.floor(Math.random() * colorArr.length)]; }); document.querySelectorAll("#small_widgets > ul").forEach(e => { e.style.color = colorArr[Math.floor(Math.random() * colorArr.length)]; }); document.querySelectorAll("#content > main > div > div > div > h1").forEach(e => { e.style.color = colorArr[Math.floor(Math.random() * colorArr.length)]; }); /*博客名称*/ document.querySelectorAll(".m-l-xs").forEach(e => { e.style.color = colorArr[Math.floor(Math.random() * colorArr.length)]; }); /*文章标题*/ document.querySelectorAll("#search_input").forEach(e => { e.style.color = colorArr[Math.floor(Math.random() * colorArr.length)]; }); /*搜索框*/ document.querySelectorAll("#content > main > div > div > h1").forEach(e => { e.style.color = colorArr[Math.floor(Math.random() * colorArr.length)]; }); document.querySelectorAll("#content > main > div > div > div > div a >span").forEach(e => { e.style.color = colorArr[Math.floor(Math.random() * colorArr.length)]; }); /*友情链接*/ document.querySelectorAll("#header > div > ul > li > div > div > div > div > div > div > a > span > span").forEach(e => { e.style.color = colorArr[Math.floor(Math.random() * colorArr.length)]; }); /*工具导航*/ document.querySelectorAll("#tag_toc > h5").forEach(e => { e.style.color = colorArr[Math.floor(Math.random() * colorArr.length)]; }); /*文章目录*/ document.querySelectorAll("#content > main > div > div > header > h1").forEach(e => { e.style.color = colorArr[Math.floor(Math.random() * colorArr.length)]; }); document.querySelectorAll("#typedWord").forEach(e => { e.style.color = colorArr[Math.floor(Math.random() * colorArr.length)]; }); /*签名标题*/ document.querySelectorAll("#tag_cloud-2 h5").forEach(e => { e.style.color = colorArr[Math.floor(Math.random() * colorArr.length)]; }); document.querySelectorAll("#tag_cloud-2 a").forEach(e => { e.style.backgroundColor = colorArr[Math.floor(Math.random() * colorArr.length)]; }); /*标签颜色*/ document.querySelectorAll("#blog_info > ul > li > span.badge.pull-right").forEach(e => { e.style.backgroundColor = colorArr[Math.floor(Math.random() * colorArr.length)]; }); /*博客信息*/ document.querySelectorAll("#blog_info > h5").forEach(e => { e.style.color = colorArr[Math.floor(Math.random() * colorArr.length)]; }); document.querySelectorAll("#widget-tabs-4-hots > h5").forEach(e => { e.style.color = colorArr[Math.floor(Math.random() * colorArr.length)]; }); document.querySelectorAll("#widget-tabs-4-hots > ul > li > div > h4 > a").forEach(e => { e.style.color = colorArr[Math.floor(Math.random() * colorArr.length)]; }); document.querySelectorAll("#widget-tabs-4-hots > ul > li > div > small > span > span.meta-value").forEach(e => { e.style.color = colorArr[Math.floor(Math.random() * colorArr.length)]; }); /*热门文章颜色*/ document.querySelectorAll("#widget-tabs-4-comments > h5").forEach(e => { e.style.color = colorArr[Math.floor(Math.random() * colorArr.length)]; }); document.querySelectorAll("#widget-tabs-4-comments > ul > li > div > div > a").forEach(e => { e.style.color = colorArr[Math.floor(Math.random() * colorArr.length)]; }); document.querySelectorAll("#widget-tabs-4-comments > ul > li > div > small > span").forEach(e => { e.style.color = colorArr[Math.floor(Math.random() * colorArr.length)]; }); /*最新评论颜色*/ document.querySelectorAll("#widget-tabs-4-random > h5").forEach(e => { e.style.color = colorArr[Math.floor(Math.random() * colorArr.length)]; }); document.querySelectorAll("#widget-tabs-4-random > ul > li > div > h4 > a").forEach(e => { e.style.color = colorArr[Math.floor(Math.random() * colorArr.length)]; }); document.querySelectorAll("#widget-tabs-4-random > ul > li > div > small > span > span.meta-value").forEach(e => { e.style.color = colorArr[Math.floor(Math.random() * colorArr.length)]; }); /*随机文章颜色*/ document.querySelectorAll("#sidebar > section.widget.widget_categories.wrapper-md.clear.visible-lg.visible-md > h5").forEach(e => { e.style.color = colorArr[Math.floor(Math.random() * colorArr.length)]; }); /*手机阅读标题*/ }sjcolor(); </script> ``` Pjax:后台主题设置回调函数内添加 ```php <!--五颜六色字体--> sjcolor(); ``` [/collapse] ## <code>自定义JavaScript</code> <div class="tip inlineBlock warning"><strong>自定义<code>JavaScript</code>丨放入后台-外观设置-开发者设置-自定义JavaScript</strong></div> ### 彩色标签云 [collapse status="false" title="彩色标签云"] ```javascript <!--左侧图标颜色and彩色标签云--> let tags = document.querySelectorAll("#tag_cloud-2 a"); let infos = document.querySelectorAll(".badge"); let colorArr = ["#428BCA", "#AEDCAE", "#ECA9A7", "#DA99FF", "#FFB380", "#D9B999"]; tags.forEach(tag => { tagsColor = colorArr[Math.floor(Math.random() * colorArr.length)]; tag.style.backgroundColor = tagsColor; }); infos.forEach(info => { infosColor = colorArr[Math.floor(Math.random() * colorArr.length)]; info.style.backgroundColor = infosColor; }); function addNumber(a) { var length = document.getElementById("comment").value.length; if(length> 0){ document.getElementById("comment").focus() document.getElementById("comment").value += '\n' + a + new Date }else{ document.getElementById("comment").focus() document.getElementById("comment").value += a + new Date } } let leftHeader = document.querySelectorAll("span.nav-icon>svg,span.nav-icon>i"); let leftHeaderColorArr = ["#FF69B4", "#58c7ea", "#E066FF", "#FF69B4", "#FFA54F", "#90EE90"]; leftHeader.forEach(tag => { tagsColor = leftHeaderColorArr[Math.floor(Math.random() * colorArr.length)]; tag.style.color = tagsColor; }); ``` 如果你的主题开启了<code>pjax</code>,需在后台<code>pjax</code>添加回调函数>pjax添加回调函数 ```javascript let tags = document.querySelectorAll("#tag_cloud-2 a"); let infos = document.querySelectorAll(".badge"); let colorArr = ["#428BCA", "#AEDCAE", "#ECA9A7", "#DA99FF", "#FFB380", "#D9B999"]; tags.forEach(tag => { tagsColor = colorArr[Math.floor(Math.random() * colorArr.length)]; tag.style.backgroundColor = tagsColor; }); infos.forEach(info => { infosColor = colorArr[Math.floor(Math.random() * colorArr.length)]; info.style.backgroundColor = infosColor; }); function addNumber(a) { var length = document.getElementById("comment").value.length; if(length> 0){ document.getElementById("comment").focus() document.getElementById("comment").value += '\n' + a + new Date }else{ document.getElementById("comment").focus() document.getElementById("comment").value += a + new Date } } ``` [/collapse] ### 播放器音乐大小 [collapse status="false" title="播放器音乐大小"] 博客开启了自动播放的哥哥们必备 ```javascript <!--音乐音量--><!--volume=0.5,数值越小音量越小--> setTimeout(function (){ document.querySelector(".skPlayer-source").volume=0.5;}, 3000); ``` [/collapse] ### 动态标题栏 [collapse status="false" title="动态标题栏"] ```javascript <!--图片链接可替换--> var OriginTitle = document.title; var titleTime; document.addEventListener('visibilitychange', function () { if (document.hidden) { $('[rel="icon"]').attr('href', "https://cdn.jsdelivr.net/gh/Catalpablog/handsome/img/warning.webp"); document.title = '网页崩溃了!!!'; clearTimeout(titleTime); } else { $('[rel="icon"]').attr('href', "https://cdn.jsdelivr.net/gh/Catalpablog/handsome/img/favicon.webp"); document.title = '咦,又好啦(✿◡‿◡)' ; titleTime = setTimeout(function () { document.title = OriginTitle; }, 2000); } }); ``` [/collapse] =page= ## <code>其他修改</code> <div class="tip inlineBlock info">这个的话就是一般都是改源代码的了</div> ### 文章内加一个正文结束 [collapse status="false" title="文章内加一个正文结束"] 在主题文件<code>post.php</code>内 ```php <!--文章内容--> ``` 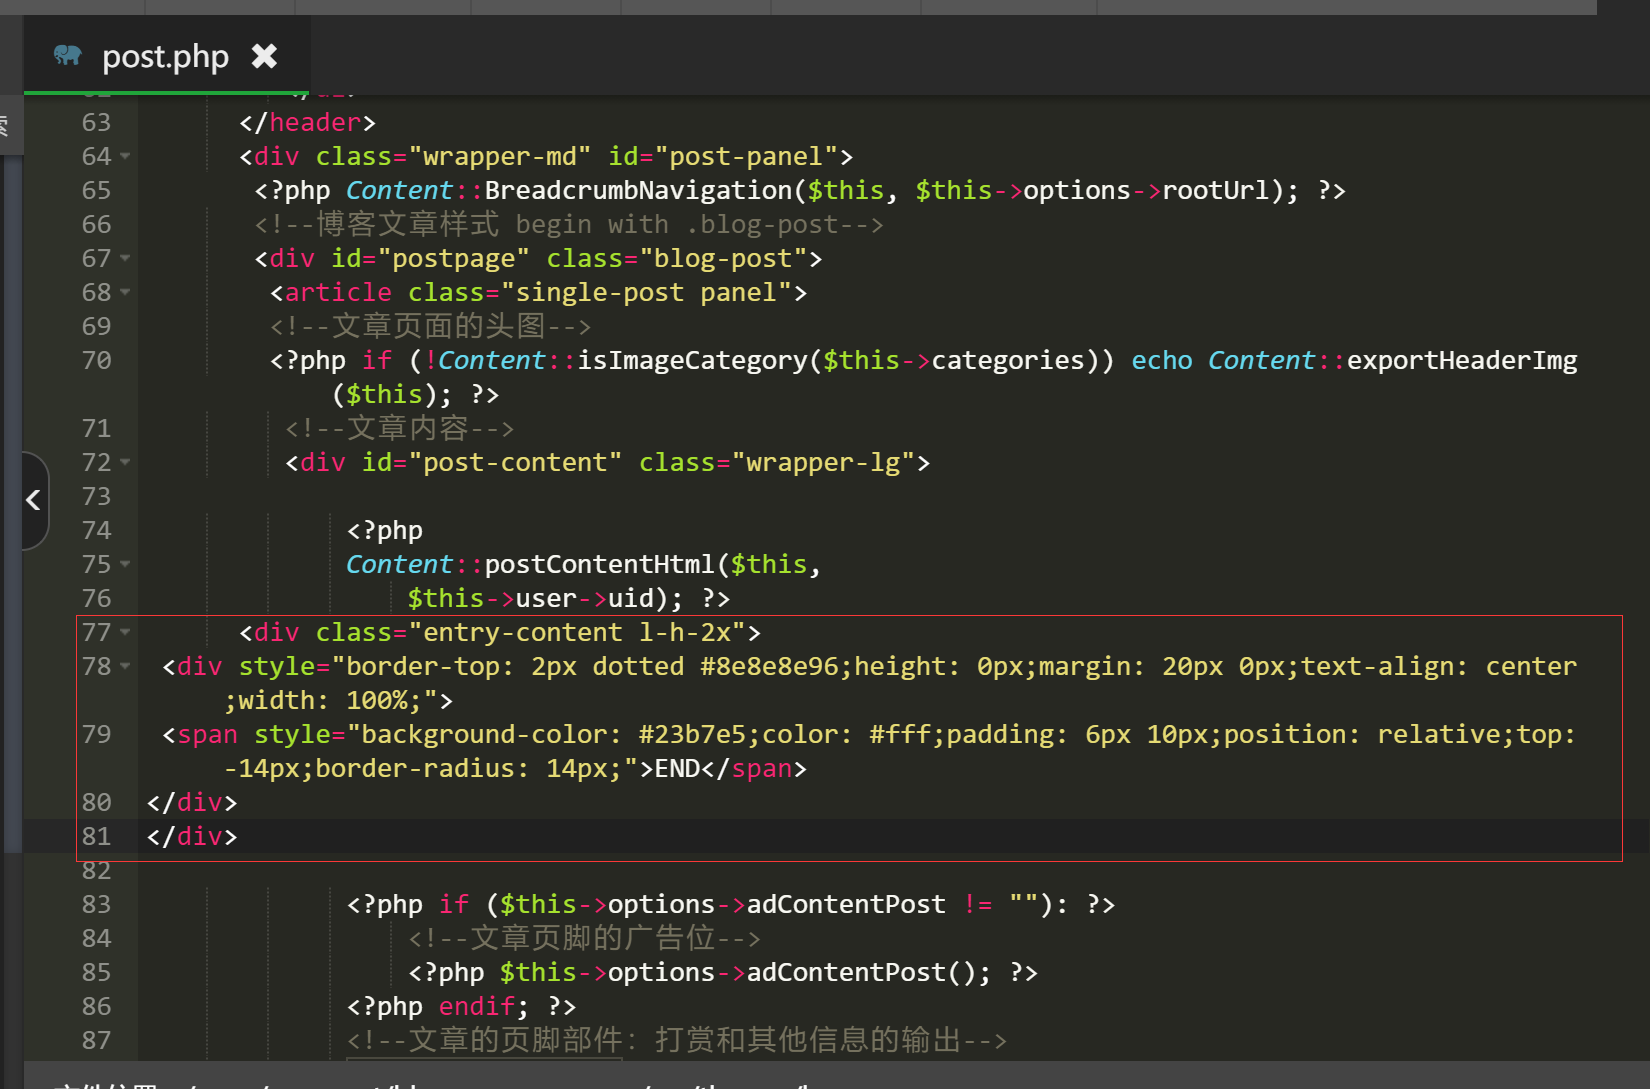 代码下面加上 ```html <div class="entry-content l-h-2x"> <div style="border-top: 2px dotted #8e8e8e96;height: 0px;margin: 20px 0px;text-align: center;width: 100%;"> <span style="background-color: #23b7e5;color: #fff;padding: 6px 10px;position: relative;top: -14px;border-radius: 14px;">END</span> </div> ``` [/collapse] ### 版权声明 [collapse status="false" title="版权声明"] 在主题文件<code>post.php</code>内,刚刚加的正文到此结束下加上 ```html <div style="padding: 10px;background: rgba(220, 220, 220, 0.22);font-size: 13px;border-left: 3px solid;text-align: left;"> <span>本文作者:<a href="<?php $this->author->permalink(); ?>" rel="author"> <?php $this->author(); ?></a></span> <span>文章标题:<a href="<?php $this->permalink() ?>"><?php $this->title() ?></a><br> <span>本文地址:<a href="<?php $this->permalink() ?>"><?php $this->permalink() ?></a><br> <span>版权说明:若无注明,本文皆<a href="<?php $this->options->rootUrl(); ?>" target="_blank" data-original-title="<?php $this->options->title() ?>"><?php $this->options->title() ?></a>原创,转载请保留文章出处。</span> ``` [/collapse] ### 高级删除线 [collapse status="false" title="文章内添加一个高级删除线"] 首先在主题文件<code>header.php</code>内底部<code>head</code>标签上面添加以下代码 ```php <!--高级删除线--> <style> span.CA a.external,span.CA a.external:visited,span.CA a.extiw,span.CA a.extiw:visited { color: #252525 } .CA,.CA a,a .CA,.CA a.new { background-color: #252525; color: #252525; text-shadow: none } body:not(.CA_toggle_on) .CA:hover,body:not(.CA_toggle_on) .CA:active,body:not(.CA_toggle_on) .CA.off { transition: color .13s linear; color: #fff } body:not(.CA_toggle_on) .CA:hover a,body:not(.CA_toggle_on) a:hover .CA,body:not(.CA_toggle_on) .CA.off a,body:not(.CA_toggle_on) a:hover .CA.off { transition: color .13s linear; color: #add8e6 } body:not(.CA_toggle_on) .CA.off .new,body:not(.CA_toggle_on) .CA.off .new:hover,body:not(.CA_toggle_on) .new:hover .CA.off,body:not(.CA_toggle_on) .CA.off .new,body:not(.CA_toggle_on) .CA.off .new:hover,body:not(.CA_toggle_on) .new:hover .CA.off { transition: color .13s linear; color: #ba0000 } </style> ``` 使用方法就是在文章内写以下,建议带(!!!) ```html !!! <span class="CA" title="你知道的太多了">你想说啥</span> !!! ``` 删除线测试`<span class="CA" title="你知道的太多了">`你想说啥 [/collapse] ### 响应耗时和访客总数 [collapse status="false" title="响应耗时和访客总数"] 首先将以下代码加到<code>/usr/themes/handsome/libs/Content.php</code>中,放在<code>class Content{}</code>之前 ```php /*访问总量*/ function theAllViews(){ $db = Typecho_Db::get(); $row = $db->fetchAll('SELECT SUM(VIEWS) FROM `typecho_contents`'); echo number_format($row[0]['SUM(VIEWS)']); } /*响应时间*/ function timer_start() { global $timestart; $mtime = explode( ' ', microtime() ); $timestart = $mtime[1] + $mtime[0]; return true; } timer_start(); function timer_stop( $display = 0, $precision = 3 ) { global $timestart, $timeend; $mtime = explode( ' ', microtime() ); $timeend = $mtime[1] + $mtime[0]; $timetotal = number_format( $timeend - $timestart, $precision ); $r = $timetotal < 1 ? $timetotal * 1000 . " ms" : $timetotal . " s"; if ( $display ) { echo $r; } return $r; } ``` 然后在<code>/usr/themes/handsome/component/sidebar.php</code>文件内,找到博客信息下面添加以下代码 ```php <li class="list-group-item text-second"> <span class="blog-info-icons"> <i data-feather="users"></i></span> <span class="badge pull-right"><?php echo theAllViews();?></span><?php _me("访客总数") ?></li> <li class="list-group-item text-second"> <span class="blog-info-icons"> <i data-feather="refresh-ccw"></i></span> <span class="badge pull-right"><?php echo timer_stop();?></span><?php _me("响应耗时") ?></li> ``` [/collapse] ### 百度收录检测 [collapse status="false" title="百度收录检测"] **修改** 1.在模板<code>post.php</code>加入(我是handsome,其他模板请查看`<a href="https://wfblog.net/go/Iw==" target="_blank">`更多->其他模板`</a>`)`</p>` ```html <!--百度收录--> <li class="meta-baidu"><span class="post-icons"><i class="glyphicon glyphicon-refresh" id="baidu_icon"></i></span><span class="meta-value" id="baidu_result">加载中</span></li> ``` 2.还是在<code>post.php</code>内加入(必须引入<code>jquery</code>) ```js <script> function baidu_check(){ $.getJSON("https://cn1.api.wfblog.net/baidu.php?domain="+window.location.href,function(result){ if (result.code == 200) { $('#baidu_icon').removeClass('glyphicon-refresh'); $('#baidu_icon').addClass('glyphicon-ok-circle'); $('#baidu_result').text('百度已收录'); }else if(result.code == 403){ $('#baidu_icon').removeClass('glyphicon-refresh'); $('#baidu_icon').addClass('glyphicon-info-sign'); $('#baidu_result').text('百度未收录'); baidu_push(); }else{ $('#baidu_icon').removeClass('glyphicon-refresh'); $('#baidu_icon').addClass('glyphicon-remove-circle'); $('#baidu_result').text('查询收录失败'); } }); } function baidu_push(){ var bp = document.createElement('script'); var curProtocol = window.location.protocol.split(':')[0]; if (curProtocol === 'https') { bp.src = 'https://zz.bdstatic.com/linksubmit/push.js'; } else { bp.src = 'http://push.zhanzhang.baidu.com/push.js'; } var s = document.getElementsByTagName("script")[0]; s.parentNode.insertBefore(bp, s); } baidu_check(); </script> ``` 3.<code>pjax</code>回调函数 ```html <!--百度收录--> if((typeof baidu_check) !== "undefined"){ baidu_check(); } ``` **其他模板** 1.在模板<code>functions.php</code>末尾合适处加入以下代码 ```php function baidu_check() { $url = baidu_url(); $api = 'https://cn1.api.wfblog.net/baidu.php?domain='; //更改为你自己的API $result = json_decode(file_get_contents($api.$url)); if($result['code'] == 200){ echo '百度已收录'; }elseif($result['code'] == 403){ echo '<a style="color:red;" rel="external nofollow" title="点击提交收录" target="_blank" href="http://zhanzhang.baidu.com/sitesubmit/index?sitename='.$url.'">百度未收录</a>'; }else{ echo '查询收录失败'; } } function baidu_url(){ if((isset($_SERVER['HTTPS']) && $_SERVER['HTTPS'] == 'on') || (isset($_SERVER['HTTP_X_FORWARDED_PROTO']) && $_SERVER['HTTP_X_FORWARDED_PROTO'] == 'https')){ return 'https'.'://'.$_SERVER['HTTP_HOST'].$_SERVER['REQUEST_URI']; }else{ return 'http'.'://'.$_SERVER['HTTP_HOST'].$_SERVER['REQUEST_URI']; } } ``` 2.然后在你需要输出检测结果的地方加入<code><?php baidu_check(); ?></code>即可 **API源码** ```php <?php /** * Baidu * @editer: Weifeng * @link: https://wfblog.net * @version: 1.0 */ error_reporting(0); header("Access-Control-Allow-Origin:*"); header('Content-type: application/json'); $domain = @$_GET['domain']; if(!isset($domain) || empty($domain) || $domain==''){ $data = array( "code" => false, "msg" => "未传入请求参数!" ); echo json_encode($data,JSON_UNESCAPED_UNICODE); exit; } if(substr($domain, -1) == '/'){ $domain = substr($domain,0,strlen($domain)-1); } $data = checkBaidu($domain); echo json_encode($data,JSON_UNESCAPED_UNICODE); function checkBaidu($url){ $header = array( "Host:www.baidu.com", "Content-Type:application/x-www-form-urlencoded",//post请求 "Connection: keep-alive", "Referer:https://www.baidu.com", "User-Agent: Mozilla/5.0 (Windows NT 10.0; Win64; x64) AppleWebKit/537.36 (KHTML, like Gecko) Chrome/80.0.3987.162 Safari/537.36" ); $url = 'https://www.baidu.com/s?ie=UTF-8&wd='.urlencode($url).'&usm=3&rsv_idx=2&rsv_page=1'; $ch = curl_init(); curl_setopt($ch, CURLOPT_URL, $url); curl_setopt ($ch, CURLOPT_HTTPHEADER, $header); curl_setopt($ch, CURLOPT_FOLLOWLOCATION,1); curl_setopt($ch, CURLOPT_RETURNTRANSFER, 1); $output = curl_exec($ch); curl_close($ch); if(strpos($output, '没有找到') || strpos($output, '很抱歉')){ $data = array( "code" => 403, "msg" => "该域名暂时未被百度收录!" ); }else{ $number = GetBetween($output,'<span class="nums_text">百度为您找到相关结果约','个</span>'); if(empty($number) || $number == 0){ $number = GetBetween($output,'<b>找到相关结果数约','个</b></p>'); if(empty($number) || $number == 0){ $data = array( "code" => false, "msg" => "获取百度收录失败!" ); return $data; } } $data = array( "code" => 200, "msg" => "该域名已被百度收录!", "number" => str_replace(',','',$number) ); } return $data; } function GetBetween($content,$start,$end){ $r = explode($start, $content); if (isset($r[1])){ $r = explode($end, $r[1]); return $r[0]; } } ?> ``` [/collapse] ### 右侧边栏百度收录 [collapse status="false" title="右侧边栏百度收录"] 注意API挂了会影响网站打开慢或者打不开等情况,请自行删除一下代码! 将下方代码粘贴至<code>/usr/themes/handsome/component</code>目录下的sidebar.php文件内。 的博客信息下方合适位置 ```html <!--百度收录--> <script> <?php //查询本站收录域名 function baidu($baidu){ $url= $_SERVER['HTTP_HOST']; $baidu="http://api.jybkw.cn/baidu/?domain=$url"; $str = file_get_contents($baidu); preg_match_all('/\d+/',$str,$arr); $arr=join('',$arr[0]); echo $arr; } ?> </script class="fa fa-paw" aria-hidden="true"> <!--百度收录--> <li class="list-group-item text-second"><span class="blog-info-icons"> <i class="fa fa-paw"></i></span> <span class="badge pull-right"><?php echo baidu($baidu) ?></span><?php _me("百度收录") ?></li> ``` [/collapse] ### 右侧边栏添加全站字数 [collapse status="false" title="右侧边栏添加全站字数"] 在 <code>component/sidebar.php</code>的开头加入下面的代码: ```php <?php //字数统计 function allOfCharacters() { $chars = 0; $db = Typecho_Db::get(); $select = $db ->select('text')->from('table.contents'); $rows = $db->fetchAll($select); foreach ($rows as $row) { $chars += mb_strlen(trim($row['text']), 'UTF-8'); } $unit = ''; if($chars >= 10000) { $chars /= 10000; $unit = '万'; } else if($chars >= 1000) { $chars /= 1000; $unit = '千'; } $out = sprintf('%.2lf %s',$chars, $unit); return $out; } ?> ``` 在 `component/sidebar.php`处,选择合适位置加入以下代码(位置大概在 90 多行) ```php <li class="list-group-item text-second"><span class="blog-info-icons"><i data-feather="edit-2"></i></span> <span class="badge pull-right"><?php echo allOfCharacters(); ?></span><?php _me("全站字数") ?></li> ``` [/collapse] ### 一键评论打卡 [collapse status="false" title="一键评论打卡"] **教程** <div class="tip inlineBlock error"> 此教程仅以Handsome主题为例 其他主题请修改相应代码</div> 1.首先在后台-->设置外观-->开发者设置-->自定义JavaScript加入以下代码: PJAX回调函数也加入这个代码 ```javascript function a(a, b, c) { if (document.selection) a.focus(), sel = document.selection.createRange(), c ? sel.text = b + sel.text + c : sel.text = b, a.focus(); else if (a.selectionStart || "0" == a.selectionStart) { var l = a.selectionStart, m = a.selectionEnd, n = m; c ? a.value = a.value.substring(0, l) + b + a.value.substring(l, m) + c + a.value.substring(m, a.value.length) : a.value = a.value.substring(0, l) + b + a.value.substring(m, a.value.length); c ? n += b.length + c.length : n += b.length - m + l; l == m && c && (n -= c.length); a.focus(); a.selectionStart = n; a.selectionEnd = n } else a.value += b + c, a.focus() } var b = (new Date).toLocaleTimeString(), c = document.getElementById("comment") || 0; window.SIMPALED = {}; window.SIMPALED.Editor = { daka: function() { a(c, "滴!学生卡!打卡时间:" + b, ",请上车的乘客系好安全带~") }, zan: function() { a(c, " 写得好好哟,我要给你生猴子!::funny:04:: ") }, cai: function() { a(c, "骚年,我怀疑你写了一篇假的文章!::funny:03:: ") } }; ``` 2.打开主题目录的component/comments.php里面的126行到144行附近: ```html <div class="comment-form-comment form-group"> <label for="comment"><?php _me("评论") ?> <span class="required text-danger">*</span></label> <textarea id="comment" class="textarea form-control OwO-textarea" name="text" rows="5" placeholder="<?php _me("说点什么吧……") ?>" onkeydown="if(event.ctrlKey&&event.keyCode==13){document.getElementById('submit').click();return false};"><?php $this->remember('text'); ?> 打卡 "> ``` 3.在后台-->设置外观-->开发者设置-->自定义CSS加入以下代码: ```css .secret_comment { top: 5px; } .OwO.OwO-open .OwO-body { display:table } ``` **效果** 见文章下方评论 [/collapse] ### 添加表情包 [collapse status="false" title="添加表情包"] 1.复制owo.json到/usr/themes/handsome/usr/ 2.上传并解压文件夹到/usr/themes/handsome/assets/img/emotion/ 3.清除一下游览器缓存,然后刷新即可 ``[button color="info" icon="" url="/usr/themes/handsome/usr/OwO.json" type=""]OwO.json[/button] [button color="info" icon="" url="/usr/themes/handsome/assets/img/emotion_KCBdkm.tar.gz" type=""]表情包[/button] `` [/collapse] ### 博客介绍打字效果 [collapse status="false" title="博客介绍打字效果"] 首页左侧博主介绍 将以下代码添加至后台-外观-初级设置-博主的介绍。 ```html ``` [/collapse] ### 首页倒计时 [collapse status="false" title="首页倒计时"] 将以下代码添加至后台-开发者设置-首页列表最前方广告位。 ```html /*首页倒计时*/ 2021年- 新年倒计时 天 时 分 秒 ``` [/collapse] ### 404页面自动返回 [collapse status="false" title="404页面自动返回"] 打开/usr/themes/handsome/404.php,在第130行左右,在 h1 class="text-shadow text-white">404 后面添加: ```html 10秒后自动返回··· 立刻返回 ``` 然后把下面这段放到最后的/body前 ```js ``` [/collapse] ### 给typecho加上心知天气 [collapse status="false" title="给typecho加上心知天气"] 1.知心天气官网www.seniverse.com注册申请免费API 密钥 2.将以下代码放入/usr/themes/handsome/component/headnav.php第55行!-- / search form --之后并更换你的公钥秘钥即可 ```html ``` [/collapse] ### 时光机添加置顶视频 [collapse status="false" title="时光机添加置顶视频"] 将以下代码分别添加至/usr/themes/handsome/component/ssy.php的?php if ($comments->have()): ?> div class="streamline b-l m-l-lg m-b padder-v"之后 ```php 你的梦想是什么! ``` [/collapse] ### 首页全站友链显示图片 [collapse status="false" title="首页全站友链显示图片"] 在aside.php里面大约210行的地方修改代码,在a标签内加上: ```php {name}"; Handsome_Plugin::output($mypattern1, 0, "ten");?> ``` [/collapse] ###侧边栏添加二维码 [collapse status="false" title="侧边栏添加二维码 "] 打开/usr/themes/handsome/component文件夹下的sidebar.php在大概81行的section之后,也就是随机文章那一块之后,博客信息之前。当然具体位置可以按照自己的喜好来。 后面另起一行,填入以下的代码保存即可: ```php ``` [/collapse] ### 版权美化教程 [collapse status="false" title="版权美化教程 "] 先把CSS代码复制到自定义CSS ```css /*底部页脚*/ .github-badge { display: inline-block; border-radius: 4px; text-shadow: none; font-size: 12px; color: #fff; line-height: 15px; background-color: #abbac3; margin-bottom: 5px } .github-badge .badge-subject { display: inline-block; background-color: #f6b044; padding: 4px 4px 4px 6px; border-top-left-radius: 4px; border-bottom-left-radius: 4px } .github-badge .badge-value { display: inline-block; padding: 4px 6px 4px 4px; border-top-right-radius: 4px; border-bottom-right-radius: 4px } .github-badge .bg-blue { background-image: -webkit-linear-gradient(0deg, #3ca5f6 0%, #a86af9 100%); } .github-badge .bg-orange { background-color: #fadfa3 } .github-badge .bg-red { background-color: #f00 } .github-badge .bg-green { background: linear-gradient(to right , #7A88FF, #d27aff); .github-badge .bg-purple { background-color: #ab34e9 } ``` 左侧代码,复制到 博客底部左侧信息 ```html Copyright©2020 MuYu | 闽ICP备18027703号-2 ``` ``右侧代码,复制到 博客底部右侧信息 ```html options->BottomInfo(); ?> ThemeTypecho | ThemeHandsome ``` 文件修改法,上方方法可能需要自行更改代码。 可以按下方截图自行修改/usr/themes/handsome/component/footer.php代码 [/collapse] ### 页脚美化 [collapse status="false" title="页脚美化"] 将以下代码,替换到下方/usr/themes/handsome/component/footer.php截图的位置。 原有代码忘记了,所以看着来啦 ```html ``` 还没结束哦,如果发现显示高度不对齐的话在后台自定义CSS上加入,下方代码。高度按自己来调整 ```css /* 底部样式修复 */ .wrapper{ padding: 11px; } ``` [/collapse] ### 滚动条显示位置百分比 [collapse status="false" title="滚动条显示位置百分比"] 好了,教程很简单,在网站添加html代码,然后在js添加监测代码,最后用css显示出来,以Typecho为例,修改前记得备份源文件。首先打开模板的header.php文件,复制以下代码,粘贴在网页之后,如图。 ```php ``` 下面代码添加到后台自定义 JavaScript ```JS //加载显示 $(window).scroll(function() { var a = $(window).scrollTop(), c = $(document).height(), b = $(window).height(); scrollPercent = a / (c - b) * 100; scrollPercent = scrollPercent.toFixed(1); $("#percentageCounter").css({ width: scrollPercent + "%" }); }).trigger("scroll"); ``` 下面代码添加至后台自定义CSS ```CSS #percentageCounter { position:fixed; left:0; top:0; height:3px; z-index:99999; background-color:#448EF6; } ``` [/collapse] ### 首页广告轮播图 [collapse status="false" title="首页广告轮播图"] 添加至后台首页列表最前方广告位 ```html 愿你走出半生 归来仍是少年 Previous Next ``` [/collapse] ### 左侧栏自修改 [collapse status="false" title="左侧栏自修改"] `请做好备份!` 建议引入 Font Awesome 图标库,在 主题后台设置 -> 开发者设置 -> 自定义输出 head 头部的 HTML 代码 里面添加下面的代码即可 ```html ``` `上面的 Font Awesome 的 css 文件来自 BootCDN 提供,你也可以替换成自己的文件。` 首先,打开 libs/Content.php ,在蓝线所示的位置: 插入下面的代码: ```html /** * * @param $categories * @return string */ public static function returnAsideCategories($categories){ $html = ""; $options = mget(); $icons = array( 'default' => 'glyphicon glyphicon-tasks', 'github' => 'fa fa-github' /** * 格式: '分类缩略名' => '图标名称', */ ); while($categories->next()) { if ($categories->levels === 0) { $children = $categories->getAllChildren($categories->mid); if (!empty($children)) { $html .= '' . $categories->name . ''; $childCategoryHtml = '' . $categories->name . ''; foreach($children as $mid){ $child = $categories->getCategory($mid); $childCategoryHtml .= '' . $child['count'] . '' . $child['name'] . ''; } $childCategoryHtml .= ''; $html .= $childCategoryHtml; $html .= ""; } else { $html .= '' . $categories->count . '' . $categories->name . ''; } } } return $html; } ``` 在 component/aside.php 中找到以下代码(大约 131 ~ 160 行),删除。 ```html options->featuresetup)){ $class = "class=\\"active\\""; } ?> > widget('Widget_Metas_Category_List')->to($categorys); echo Content::returnCategories($categorys) ?> ``` 然后在下图蓝线所示的位置( 127 行左右 ) 插入以下代码: ```html widget('Widget_Metas_Category_List')->to($categorys); echo Content::returnAsideCategories($categorys) ?> ``` 然后,刷新你的博客,是不是就有效果了呢? **设置图标** 设置方法:在 $icons 的 array 数组中插入 '分类缩略名' => '图标' 即可。 有人可能不知道在哪里哈(其实是我不知道 [](https://blog.iucky.cn/usr/themes/handsome/assets/img/emotion/aru/shit.png) ) 在/handsome/libs/content.php中,我们可以看到有这么一行$icons = array(,下面包含着像是'system' => 'fa fa-apple',这样的代码,那你就找对了,接下来看怎么设置吧~ **请记住最后一句不能加逗号!!** ```html 'music' => 'fa fa-music', 'life' => 'fa fa-meetup' //这是最后一句,没有逗号!! ``` 如果你引入了 `Font Awesome` 的图标的话,可以到 [https://fontawesome.dashgame.com/](https://fontawesome.dashgame.com/) 选择你喜欢的图标使用。 `使用样例` 使用 `archive` 图标时: 对应在 `$icons` 的 array 数组中插入的代码: ```php 'archives' => 'fa fa-archive' ``` `Fontello` handsome 主题自带部分 `fontello` 图标,具体列表可在 [handsome 主题文档](https://auth.ihewro.com/user/docs/#/icons) 查看。 **使用方法** 在图标的名字前加入 `fontello fontello-` 即可。 ****使用样例 与 `Font Awesome` 相似,在此不多赘述。 **Feather** handsome 主题自带 `feather` 的所有图标,在此处使用需要一些变通措施。 **使用方法** 在 [https://feathericons.com/](https://feathericons.com/) 选取好你需要的图标。 然后在名称前插入 `" data-feather="` ,再输入名称即可。 ****使用样例 以 `airplay` 为例: 输入 `'airplay' => '" data-feather="airplay'` 即可。 **其他 SVG 格式的图标** **使用方法** 在 svg 的开头加入 `">` ,在结尾加入 ` 即可。 **使用样例** 下载下来的 `svg` 文件内容: 将其复制,然后在 `$icons` 的 array 数组中插入的代码: ```php 'airplay' => '"> 快捷搜索 百度搜狗360必应谷歌百度搜索搜索搜狗搜索搜索360搜索搜索必应搜索搜索谷歌搜索搜索 ``` [/collapse] ### 为typecho站点设置多个域名 [collapse status="false" title="为typecho站点设置多个域名"] 打开程序目录的这个文件 `/var/Widget/Options.php` 使用搜索找到这个位置 ```php /** 初始化站点信息 */ if (defined('__TYPECHO_SITE_URL__')) { $this->siteUrl = __TYPECHO_SITE_URL__; } ``` 上面的代码最前面加入下面的代码(域名改成你自己的) ```php if($_SERVER['SERVER_NAME']=='www.muyu.com'){//chen added $this->siteUrl = 'http://www.muyu.com'; } ``` [/collapse] ### 超链接特效 [collapse status="false" title="超链接特效"] 修改 `/usr/themes/handsome/assets/css/handsome.min.css`,删除这两节: ```css .comment-content-true a:hover,.wrapper-lg .entry-content a:hover{ color:#222;border-bottom-color:#222 } .comment-content-true a,.wrapper-lg .entry-content a{ color:#58666e;border-bottom-color:#222;border-bottom:1px solid #999;word-wrap:break-word;word-break:break-all } ``` 后台 `自定义CSS:` ```css /*超链接特效*/ .comment-content-true a:not(.light-link):not(.post_inser_a),.wrapper-lg .entry-content a:not(.light-link):not(.post_inser_a){position:relative;margin:auto 4px;color:#23b7e5;-webkit-transition:color .3s;transition:color .3s;-webkit-perspective:600px;perspective:600px;-webkit-perspective-origin:50% 100%;perspective-origin:50% 100%;word-wrap:break-word;word-break:break-all;white-space:nowrap;text-overflow:ellipsis;overflow:hidden;max-width:inherit;width:inherit} .comment-content-true a:not(.light-link):not(.post_inser_a):focus,.comment-content-true a:not(.light-link):not(.post_inser_a):hover,.wrapper-lg .entry-content a:not(.light-link):not(.post_inser_a):focus,.wrapper-lg .entry-content a:not(.light-link):not(.post_inser_a):hover{color:#fff} .comment-content-true a:not(.light-link):not(.post_inser_a)::after,.comment-content-true a:not(.light-link):not(.post_inser_a)::before,.wrapper-lg .entry-content a:not(.light-link):not(.post_inser_a)::after,.wrapper-lg .entry-content a:not(.light-link):not(.post_inser_a)::before{position:absolute;top:0;left:-4px;z-index:-1;box-sizing:content-box;padding:0 4px;width:100%;height:100%;content:''} .comment-content-true a:not(.light-link):not(.post_inser_a)::before,.wrapper-lg .entry-content a:not(.light-link):not(.post_inser_a)::before{background-color:#23b7e5;-webkit-transition:-webkit-transform .2s;transition:transform .2s;-webkit-transition-timing-function:cubic-bezier(.7,0,.3,1);transition-timing-function:cubic-bezier(.7,0,.3,1);-webkit-transform:rotateX(90deg);transform:rotateX(90deg);-webkit-transform-origin:50% 100%;transform-origin:50% 100%} .comment-content-true a:not(.light-link):not(.post_inser_a):focus::before,.comment-content-true a:not(.light-link):not(.post_inser_a):hover::before,.wrapper-lg .entry-content a:not(.light-link):not(.post_inser_a):focus::before,.wrapper-lg .entry-content a:not(.light-link):not(.post_inser_a):hover::before{-webkit-transform:rotateX(0);transform:rotateX(0)} .comment-content-true a:not(.light-link):not(.post_inser_a)::after,.wrapper-lg .entry-content a:not(.light-link):not(.post_inser_a)::after{border-bottom:1px solid #23b7e5} ``` 如果使用版权提示插件,链接有可能会超出提示框,添加以下css解决: ```css .content-copyright {overflow: hidden} ``` [/collapse] ### 随机API头图 [collapse status="false" title="随机API头图"] **用法** 1. 首先把文章最后的代码存到一个php文件里,位置任意,我这里的位置为`/code/get_img.php` 2. 打开`/usr/themes/handsome/libs/Content.php`文件找到`whenSwitchHeaderImgSrc`函数附近 3. 注释掉`$randomNum = unserialize(INDEX_IMAGE_ARRAY);`和`$random = THEME_URL . 'usr/img/sj/' . @$randomNum[$index] . '.jpg';` 4. 添加一行`$random = '/code/get_img.php?_='.rand(999, 3000);` 修改完的 `Content.php`文件 `whenSwitchHeaderImgSrc`函数附近应该是长这样的。 **配置文件** 根据我代码里的样式添加图片的配置就可以了,最好找用id区分图片的网站,配置项会短小很多。 `list`里面是图片id `fun`里面是当前数组的url生成函数,想通过参数修改图片大小在这里面修改就搞定了。 ```php [267371,230477,1115680,838413,235922,1560424,1056251,416160,96938,2194261, 666839,1133957,1269025,1089932,338711,573910,670061,3113124,247431,434090, 1209843,1684187,358312,1536619,96380,164821,373945,1547248,301920,256468, 1653823,59106,556665,461198,376464,321588,3193917,1040157,189349,396547, 3145552,220067,285173,409701,917076,255464,735911,2120016,1162540,], //'fun'=> function($id){return "https://images.pexels.com/photos/{$id}/pexels-photo-{$id}.jpeg?auto=compress&cs=tinysrgb&dpr=1&w=500";} 'fun'=> function($id){return "https://api.btstu.cn/sjbz/api.php?lx=dongman&format=images";} ]; //https://i.keaitupian.net/ // $imgArr[1] = [ // 'list'=>[ // 'up/40/c0/7c/ec2caa4f7b67d2b44a95bece4e7cc040.jpg', // 'up/38/05/17/57ae05cdfe607c1f877a7881ea170538.jpg' // ], // 'fun'=> function($id){return "https://i.keaitupian.net/".$id;} // ]; function oneImg($id=false){ global $imgArr; //求图片总数 // echo $count; //随机选择一个 if($id == false){ $count = 0; foreach($imgArr as $item){ $count += count($item['list']); } $id = rand(0, $count - 1); } //累积下标 $key = 0; foreach($imgArr as $item){ if(isset($item['list'][$id - $key])){ return $item['fun']($item['list'][$id - $key]); }else{ $key += count($item['list']); continue; } } } header('Location: '.oneImg(isset($_GET['id'])?$_GET['id']:false));exit; ``` [/collapse] ### 博客元素抖动效果 [collapse status="false" title="博客元素抖动效果"] **`效果展示`** Wibus`` **`使用方法`** 1. 首先给需要颤抖元素加上class属性:Pshake ```html Wibus 等等 ``` 2. 给`Pshake`一个`display`属性`inline-block`,使得元素可以超出父元素颤抖,否则只能原地颤抖。 3. 加上`will-change`属性,开启GPU渲染加速,防止在低性能设备中造成卡顿。`will-change`属性可能会造成元素层叠顺序混乱(z-index混乱)`过度使用可能造成反向优化 !` 4. `transform-origin: center center;`进行中心定位。这个属性需要在前面加上`-webkit-`和`-ms-`进行内核适配 5. `animation: name duration timing-function infinite;` 四个属性分别为:动画名称、动画多少时间内完成、如何进行动画周期、无限循环 ```css .Pshake{ display: inline-block; will-change: transform; /*可以删除*/ -webkit-transform-origin: center center; -ms-transform-origin: center center; transform-origin: center center; -webkit-animation: Pshake_Crazy 1s ease-in-out infinite; animation: Pshake_Crazy 1s ease-in-out infinite; } ``` 现在元素的属性就全部设置好了。下面进行动画的帧的制作。动画帧可以按照自己想要的抖动方式进行 下面是 sample仅供参考。你可以在动画帧中添加更多。在 translate、rotate、opacity等等多种属性中进行组合。 关键帧越多抖动越疯狂! ```css @keyframes Pshake_Crazy{ 10%{transform:translate(-0.5px,-0.5px) rotate(0.5deg);} 20%{transform:translate(-0.5px,1.5px) rotate(0.5deg);} 30%{transform:translate(1.5px,0.5px) rotate(0.5deg);} 40%{transform:translate(1.5px,-0.5px) rotate(-0.5deg);} 50%{transform:translate(2.5px,1.5px) rotate(1.5deg);} 60%{transform:translate(-0.5px,-0.5px) rotate(-0.5deg);} 70%{transform:translate(-0.5px,2.5px) rotate(1.5deg);} 80%{transform:translate(2.5px,-1.5px) rotate(-0.5deg);} 90%{transform:translate(1.5px,-0.5px) rotate(1.5deg);} 0%,100%{transform:translate(0,0) rotate(0);} } ``` **高阶抖动~随机关键帧** 如上所说【关键帧越多抖动越疯狂!】但是手动写好多好麻烦,不想写啊。而且上面那一串看的头都大。 那么 emmmm.....不写了。 用JS自动生成吧。嗯。下面不解释了,直接放上代码。 ```js function random_keyframes(){ var a='@keyframes Pshake_Crazy{',b='%{transform:translate(',c='px,',d='px) rotate(',e='deg);}', f='0%,100%{transform:translate(0,0) rotate(0);}}',g='',i=1, jitter=30 /*抖动幅度 >=10*/ , level=1 /*抖动程度 1~99*/; function XYRrandom(){ let _xyr_num=((~(Math.random()*jitter))+(~~(Math.random()*jitter)) )/10; return _xyr_num;} for (i; i<100; i+=level) { g=i+b+XYRrandom()+c+XYRrandom()+d+XYRrandom()+e;a=a+g; } return a+f;} ``` `打开网页调用上方的函数 random_keyframes()就会随机生成关键帧。这样每次刷新网页、打开网页抖动的频率都不一样了。` [/collapse] ### 文章分页 [collapse status="false" title="文章分页"] 转至[银河小筑](https://yinhe.co/archives/20201117_handsome_pagenav.html) 修改文件 `typecho/usr/themes/handsome/libs/Content.php` 1. 在文件最后一个}前添加如下两个私有函数 请注意:添加代码前删除掉如下代码中第4行splitword变量的值中page前后的两个间隔。 ```php // 文章分页 private static function parse($text) { $pagebar = ''; $content = $text; $splitword = '= page ='; if( strpos( $text , $splitword) !== false){ $contents = explode($splitword , $text ); $page = isset($_GET['page'])?intval($_GET['page']):1; $content = $contents[$page-1]; $request = Typecho_Request::getInstance(); $_GET['page'] = '{page}'; $pagebar = self::setPageBar(count($contents),$page,$request->getPathinfo()."?". http_build_query($_GET)); } $text = $content.$pagebar; return $text; } private static function setPageBar($pageTotals,$page,$pageTemplate) { $isRewrite = Typecho_Widget::widget('Widget_Options')->rewrite; $siteUrl = Typecho_Widget::widget('Widget_Options')->rootUrl; $pageTemplate = ($isRewrite ? rtrim($siteUrl, '/') : $siteUrl."index.php") . $pageTemplate; $splitPage = 3; $pageHolder = array('{page}', '%7Bpage%7D'); if ($pageTotals < 1) { return; } $pageBar .= ''; if ($page > 1) { $pageBar .= '' . ''; } for ($i = 1; $i <= $pageTotals; $i ++) { if($page==$i){ $pageBar .= '' . $i . ''; }else {if((($i==$page-3) and ($i!=1)) or (($i==$page+3) and ($i!=$pageTotals))) { $pageBar .= '...'; }else{ if((($i<$page-3) and ($i!=1)) or (($i>$page+3) and ($i!=$pageTotals))) {}else{ $pageBar .= '' . $i . ''; } } } } if ($page < $pageTotals) { $pageBar .= '' . ''; } $pageBar .=''; return $pageBar; } ``` 2. 修改parseContentPublic函数的定义,添加一个参数$need2pagination并提供替换值 在文件 `Content.php`的1987行前后。 默认值 `False`,因此至少情况下不会调用内容分页函数避免对handsome原来的处理逻辑造成的影响,某些评论者在评论内容中插入分页符就比较比较尴尬了 ```php public static function parseContentPublic($content,$need2pagination=False) ``` 3. 在parseContentPublic函数中调用分页函数 在文件 `Content.php`的2092行前后,语句 `return $content;`之前增加一行代码,代码片段: ```php //文章分页 if ($need2pagination==True) { $content=self::parse($content);} return $content; } ``` 4. 对于需要分页的内容,修改调用parseContentPublic函数,添加need2pagination参数 例如需要提供post的分页功能,仅需要修改如下函数 `public static function postContent($obj, $status, $way = "origin")`,搜索文本 `该部分仅登录用户可见`,在文件 `Content.php`的2092行前后: ```php // $content = Content::parseContentPublic($content); //该行修改前语句,下一行为修改后语句 $content = Content::parseContentPublic($content,True); } return trim($content); } ``` 目前只测过对帖子分页,页面等其他内容的分页没测试过。其他内容如果需要分页,同样可以用($content,True)参数试试,风险自担。 5. 在文章中分页 文章需要分页处添加行 `= page =`(注意去掉页面前后的间隔)。当然也可以修改代码换成其他标识。 [/collapse] ### 调用bilibili视频响应式代码 [collapse status="false" title="调用bilibili视频响应式代码"] 转至:[隔壁老杜丶](https://www.googlessr.top/archives/131.html) **效果** 手机端: ![请输入图片描述]() 电脑端:[传送门](https://muyu.love/90.html?page=2) `食用方法` 打开bilibili的某个视频,然后如上图找到嵌入代码 ![请输入图片描述]() ```php ``` 复制嵌入代码添加到文章。 然后在给iframe 这个标签添加 class="iframe_video" iframe_video这个类名 修改后的代码: ```php ``` 之后就是添加样式css了,在模板后台-开发者设置-自定义CSS中添加以下代码: ```css /*视频挂载*/ .iframe_video { position: relative; width: 100%; } @media only screen and (max-width: 767px) { .iframe_video { height: 15em; } } @media only screen and (min-width: 768px) and (max-width: 991px) { .iframe_video { height: 20em; } } @media only screen and (min-width: 992px) and (max-width: 1199px) { .iframe_video { height: 30em; } } @media only screen and (min-width: 1200px) { .iframe_video { height: 40em; } } .iframe_cross { position: relative; width: 100%; height: 0; padding-bottom: 75% } .iframe_cross iframe { position: absolute; width: 100%; height: 100%; left: 0; top: 0 } ``` 大功告成,直接在文章中插入修改后的Bilibili嵌入代码就可以显示了。 [/collapse] ### 自定义后台路径 [collapse status="false" title="自定义后台路径"] [scode type="blue"] **建议:** * 不要使用默认的 admin 后台地址,不仅仅是 Typecho,其他程序也是类似 * 不要使用默认的 admin 用户名 * 请使用强密码,即 字母、数字以及特殊字符的组合,且长度在 8 位以上 [/scode] **方法** 修改后台登陆地址其实很简单,分成两步即可。 **第一步** 将Typecho程序根目录中的后台文件夹"admin"改名,名字即为你想自定义的地址名,例如:将"admin"改为"xxx" **第二步** 修改根目录文件"config.inc.php",打开该文件后找到 /* 后台路径(相对路径) / define('__TYPECHO_ADMIN_DIR__', '/admin/'); 将代码中"admin"改为你自定义的地址,例如:xxx **然后** 我们的Typecho程序网站的后台,就改成:xxx/xxx了 [scode type="red"] **注意!** * 上面两次操作设置的名称应保持一致! * 请不要在 robots.txt 文件中泄露你刚刚修改过后的文件地址。 [/scode] **写在最后** 你甚至还可以调戏访问 admin 路径的访客:在网站目录下新建 admin 文件里,下面放一个 index.html ,这个 index.html 里你可以尽情的嘲讽或者调戏你的访客! [/collapse] ### Typecho添加评论自动排第一功能栏目 [collapse status="false" title="Typecho添加评论自动排第一功能栏目"] 1、将下面的代码复制粘贴到handsome主题的functions.php文件中。 ```php function Autofirst(){ $db = Typecho_Db::get(); $query = $db->select()->from('table.comments')->where('authorId = ?','0')->order('coid',Typecho_Db::SORT_DESC)->limit(100); $result = $db->fetchAll($query); $arrUrl = array(); $arrAuthor = array(); foreach ($result as $value) { if($value["url"]!==null){ array_push($arrUrl,$value["url"]); array_push($arrAuthor,$value["author"]); } } $su=array_filter(array_merge(array_unique($arrUrl))); $sa=array_filter(array_merge(array_unique($arrAuthor))); $num=0; for($i=0;$iselect()->from('table.comments')->where('url = ?',$su[$i])->order('coid',Typecho_Db::SORT_DESC)->limit(100); $result1 = $db1->fetchAll($query1); $arrAuthor1 = array(); foreach ($result1 as $value) { array_push($arrAuthor1,$value["author"]); } echo ''.$arrAuthor1[0].''; } } } ``` 其中,functions里的“num<8”的8就是用来定义显示数量,推荐为4的倍数。 2、将下面CSS代码复制粘贴到Typecho后台“控制台>外观>设置外观>开发者设置>自定义CSS”中。 ```php .autofirst1 .item{ padding:5px 10px } .overflow{ overflow:hidden; white-space: nowrap; word-wrap: normal; } .autofirst1{ padding:10px 20px } ``` 如果需要让按钮圆角显示,如果添加下面样式: ```php .item a{border-radius:10px} ``` 3、将下面HTML代码添加到handsome主题目录的index.php文件中。 ```php 每评论一次就会自动排在本栏目第一位 ``` 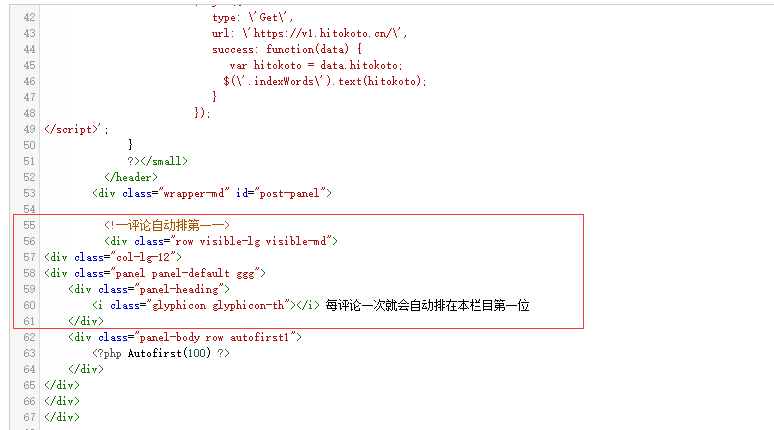 [/collapse] ### 人生倒计时美化教程 [collapse status="false" title="人生倒计时美化教程"] 转载至:[Bliss'Blog](https://blog.kk03.cn/102.html) 第一步,先找到路径/usr/themes/handsome/component/aside.php,在217行左右添加如下代码 ```html 人生倒计时 今日已经过去小时 这周已经过去天 本月已经过去天 今年已经过去个月 ``` 我修改过的代码 ```php 今日已经过去小时 这周已经过去天 本月已经过去天 今年已经过去个月 ``` 第二步-添加完成后,在主题后台自定义css里添加如下代码,一般都是在主题设置-开发者设置-自定义CSS样式丢进去就行了 ```css /* 时间表 */ .aside-count .content { padding: 15px } .aside-count .content .item { margin-bottom: 15px } .aside-count .content .item:last-child { margin-bottom: 0 } .aside-count .content .item .title { font-size: 12px; color: var(--minor); margin-bottom: 5px; display: flex; align-items: center } .aside-count .content .item .title span { color: var(--theme); font-weight: 500; font-size: 14px; margin: 0 5px } .aside-count .content .item .progress { display: flex; align-items: center } .aside-count .content .item .progress .progress-bar { height: 10px; border-radius: 5px; overflow: hidden; background: var(--classC); width: 0; min-width: 0; flex: 1; margin-right: 5px } @keyframes progress { 0% { background-position: 0 0 } 100% { background-position: 30px 0 } } .aside-count .content .item .progress .progress-bar .progress-inner { width: 0; height: 100%; border-radius: 5px; transition: width 0.35s; -webkit-animation: progress 750ms linear infinite; animation: progress 750ms linear infinite } .aside-count .content .item .progress .progress-bar .progress-inner-1 { background: #bde6ff; background-image: linear-gradient(135deg, #50bfff 25%, transparent 25%, transparent 50%, #50bfff 50%, #50bfff 75%, transparent 75%, transparent 100%); background-size: 30px 30px } .aside-count .content .item .progress .progress-bar .progress-inner-2 { background: #ffd980; background-image: linear-gradient(135deg, #f7ba2a 25%, transparent 25%, transparent 50%, #f7ba2a 50%, #f7ba2a 75%, transparent 75%, transparent 100%); background-size: 30px 30px } .aside-count .content .item .progress .progress-bar .progress-inner-3 { background: #ffa9a9; background-image: linear-gradient(135deg, #ff4949 25%, transparent 25%, transparent 50%, #ff4949 50%, #ff4949 75%, transparent 75%, transparent 100%); background-size: 30px 30px } .aside-count .content .item .progress .progress-bar .progress-inner-4 { background: #67c23a; background-image: linear-gradient(135deg, #4f9e28 25%, transparent 25%, transparent 50%, #4f9e28 50%, #4f9e28 75%, transparent 75%, transparent 100%); background-size: 30px 30px } .aside-count .content .item .progress .progress-percentage { color: var(--info) } ``` 第三步-添加完成后,在到/usr/themes/handsome/assets/js里面创建名为timeinfo.js后把下面代码复制进去保存. ```js function init_life_time() { function getAsideLifeTime() { /* 当前时间戳 */ let nowDate = +new Date(); /* 今天开始时间戳 */ let todayStartDate = new Date(new Date().toLocaleDateString()).getTime(); /* 今天已经过去的时间 */ let todayPassHours = (nowDate - todayStartDate) / 1000 / 60 / 60; /* 今天已经过去的时间比 */ let todayPassHoursPercent = (todayPassHours / 24) * 100; $('#dayProgress .title span').html(parseInt(todayPassHours)); $('#dayProgress .progress .progress-inner').css('width', parseInt(todayPassHoursPercent) + '%'); $('#dayProgress .progress .progress-percentage').html(parseInt(todayPassHoursPercent) + '%'); /* 当前周几 */ let weeks = { 0: 7, 1: 1, 2: 2, 3: 3, 4: 4, 5: 5, 6: 6 }; let weekDay = weeks[new Date().getDay()]; let weekDayPassPercent = (weekDay / 7) * 100; $('#weekProgress .title span').html(weekDay); $('#weekProgress .progress .progress-inner').css('width', parseInt(weekDayPassPercent) + '%'); $('#weekProgress .progress .progress-percentage').html(parseInt(weekDayPassPercent) + '%'); let year = new Date().getFullYear(); let date = new Date().getDate(); let month = new Date().getMonth() + 1; let monthAll = new Date(year, month, 0).getDate(); let monthPassPercent = (date / monthAll) * 100; $('#monthProgress .title span').html(date); $('#monthProgress .progress .progress-inner').css('width', parseInt(monthPassPercent) + '%'); $('#monthProgress .progress .progress-percentage').html(parseInt(monthPassPercent) + '%'); let yearPass = (month / 12) * 100; $('#yearProgress .title span').html(month); $('#yearProgress .progress .progress-inner').css('width', parseInt(yearPass) + '%'); $('#yearProgress .progress .progress-percentage').html(parseInt(yearPass) + '%'); } getAsideLifeTime(); setInterval(() => { getAsideLifeTime(); }, 1000); } init_life_time() ``` 第四步-最后到开发者设置-自定义输出body尾部的HTML代码里面引入此js ```code ``` [/collapse] ### 增加标签云独立页面 [collapse status="false" title="增加标签云独立页面"] 转载至:[丛林小二](https://www.ttker.com/archives/30/) 感觉在每个页面都把标签云显示出来会有点乱,但标签云的存在又有它自己的作用,于是想着将标签云单独在一个页面中罗列出来。 新建一个名为:tags.php文件,填入以下代码后存放在模板目录下: ```php need('component/header.php'); ?> need('component/aside.php'); ?> user->hasLogin(),true); ?> options->rootUrl); ?> to($tags); ?> have()): ?> next()): ?> name(); ?> options) ?> need('component/sidebar.php'); ?> need('component/footer.php'); ?> ``` 完成后,在后台创建独立页面,自定义模板选择刚刚新建的“标签云”模板,可以不用填入任何内容,直接发布便完成。 [/collapse] ### 相关文章、随机文章的样式美化 [collapse status="false" title="相关文章、随机文章的样式美化"] 转载至:[丛林小二](https://www.ttker.com/archives/25.html) 修改代码:`post.php` 与 `functions_mine.php`: post.php,看需求调用 ```php related(3)->to($relatedPosts); ?> have()): ?> 猜你想看 next()): ?> title(); ?> 随机文章 随机文章 ``` functions_mine.php:文件末尾处 ```php /** * 随机文章,在需要添加随机文章的地方加上代码: * 数字10为要调用的文章数量。 */ function getRandomPosts($random) { $modified = $random->modified; $db = Typecho_Db::get(); $adapterName = $db->getAdapterName();//兼容非MySQL数据库 if ($adapterName == 'pgsql' || $adapterName == 'Pdo_Pgsql' || $adapterName == 'Pdo_SQLite' || $adapterName == 'SQLite') { $order_by = 'RANDOM()'; } else { $order_by = 'RAND()'; } $sql = $db->select()->from('table.contents') ->where('status = ?', 'publish') ->where('table.contents.created <= ?', time()) ->where('type = ?', 'post') ->limit($random) ->order($order_by); $result = $db->fetchAll($sql); foreach ($result as $val) { $val = Typecho_Widget::widget('Widget_Abstract_Contents')->push($val); echo ' ' . $val['title'] . ' '; } } ``` 相关文章及随机文章列表的标题增加了自定义样式:tt-suiji-title 添加至后台自定义CSS ```css .tt-suiji-title{color: #777;background-color: #eee;} ``` [/collapse] ### 栏目列表美化 [collapse status="false" title="栏目列表美化"] 转载至:[丛林小二](https://www.ttker.com/archives/20.html) 文件:`Content.php`文件,位于:主题 / handsome / libs /,~将第1156行开始的下述代码(V7.3.1),~ 将第1164行开始的下述代码(V8.1.0): ```php ``` 替换为: ```php ``` 设置外观→开发者设置→自定义CSS,填入以下css样式: ```css .tt-small-blur{position:relative;z-index:1;display:flex;overflow:hidden;background-color:#333;color:#fff;} .tt-small-blur .tt-left-box{z-index:1;-webkit-clip-path:polygon(0 0,94% 0,100% 100%,0 100%);clip-path:polygon(0 0,94% 0,100% 100%,0 100%);} .tt-small-blur .tt-left-img{width:100%;height:100%;-o-object-fit:cover;object-fit:cover;} .tt-small-blur .tt-blur-img{position:absolute;top:0;right:0;bottom:0;left:0;z-index:0;width:100%;height:100%;background-position:center;background-size:cover;transform:scale(1.4);-o-object-fit:cover;object-fit:cover;-webkit-filter:blur(1.275rem) brightness(.83);filter:blur(1.275rem) brightness(.83);} .tt-small-blur .post-meta{z-index:1;display:flex;color:inherit;flex-direction:column;justify-content:space-between;} .tt-small-blur .text-title{color:inherit;} .tt-small-blur .post-meta h2,.tt-small-blur .post-meta p{text-shadow:.1875rem .1875rem .3125rem #333;letter-spacing:.09rem;} .tt-small-blur .text-muted{color:inherit;} .tt-small-blur .post-meta {padding: 30px 30px 15px 30px;} @media (max-width:500px){.tt-small-blur .index-post-title{display:-webkit-box;display:-moz-box;overflow:hidden;margin-bottom:2px;height:48px;text-overflow:ellipsis;white-space:normal;word-wrap:break-word;line-height:1.4;-webkit-line-clamp:2;-webkit-box-orient:vertical;-moz-line-clamp:2;-moz-box-orient:vertical;word-break:break-all;}} @media (max-width:500px){.tt-small-blur .summary{display:none;}} @media (max-width:380px){.tt-small-blur .post-meta{padding:10px 15px;}} @media (min-width:768px) and (max-width: 1199px){.tt-small-blur .summary {height: 55px;}.tt-small-blur .line-lg {margin-top: 1px;margin-bottom: 1px;}} ``` [/collapse] ### 全站字数-在线人数-访客总数-网站加载耗时 [collapse status="false" title="全站字数-在线人数-访客总数-网站加载耗时"] 声明:本教程转载至[云时代之烙印](https://www.cloudsd.com/archives/25.html) 以下代码添加至/usr/themes/handsome/functions.php内第一行php后 ```php /**自定义 * 访问总量 */ function theAllViews(){ $db = Typecho_Db::get(); $row = $db->fetchAll('SELECT SUM(VIEWS) FROM `typecho_contents`'); echo number_format($row[0]['SUM(VIEWS)']); } /** * 响应时间 */ function timer_start() { global $timestart; $mtime = explode( ' ', microtime() ); $timestart = $mtime[1] + $mtime[0]; return true; } timer_start(); function timer_stop( $display = 0, $precision = 3 ) { global $timestart, $timeend; $mtime = explode( ' ', microtime() ); $timeend = $mtime[1] + $mtime[0]; $timetotal = number_format( $timeend - $timestart, $precision ); $r = $timetotal < 1 ? $timetotal * 1000 . " ms" : $timetotal . " s"; if ( $display ) { echo $r; } return $r; } /** * 获取访客IP并保存 */ $ip = $_SERVER['REMOTE_ADDR']; $time = gmdate("H:i:s",time()+8*3600); $file = "ip.txt" ; $fp=fopen ("ip.txt","a") ; $txt= "$ip"."----"."$time"."\n"; fputs($fp,$txt); /** * 在线人数 */ function online_users() { $filename='online.txt'; //数据文件 $cookiename='Nanlon_OnLineCount'; //Cookie名称 $onlinetime=30; //在线有效时间 $online=file($filename); $nowtime=$_SERVER['REQUEST_TIME']; $nowonline=array(); foreach($online as $line){ $row=explode('|',$line); $sesstime=trim($row[1]); if(($nowtime - $sesstime)<=$onlinetime){ $nowonline[$row[0]]=$sesstime; } } if(isset($_COOKIE[$cookiename])){ $uid=$_COOKIE[$cookiename]; }else{ $vid=0; do{ $vid++; $uid='U'.$vid; }while(array_key_exists($uid,$nowonline)); setcookie($cookiename,$uid); } $nowonline[$uid]=$nowtime; $total_online=count($nowonline); if($fp=@fopen($filename,'w')){ if(flock($fp,LOCK_EX)){ rewind($fp); foreach($nowonline as $fuid=>$ftime){ $fline=$fuid.'|'.$ftime."\n"; @fputs($fp,$fline); } flock($fp,LOCK_UN); fclose($fp); } } echo "$total_online"; } // 自定义END ``` 以下代码添加至/usr/themes/handsome/component/sidebar.php内 ```php ``` [/collapse] ### 加载动画 [collapse status="false" title="加载动画"] 声明:本段教程来至[故梦](https://www.gmit.vip/)源码! 以下代码添加至/usr/themes/handsome/header.php内 最后 ```php ``` 主题设置,自定义 JavaScript,添加以下代码 ```js $(function(){ $("#PageLoading").fadeOut(400); $("#body").css('overflow',''); }); ``` [/collapse] =page= ## Handsome文件 ```txt component/aside.php 左边导航栏 component/comments.php 评论区 component/footer.php 底部版权、音乐播放器之类 component/header.php 页面头,没啥要改的 component/headnav.php 顶部导航 component/say.php 时光机动态 component/sidebar.php 右侧栏目 component/third_party_comments.php 3.3.0新增,第三方评论 css/ 博客CSS,一般不要改 fonts/ 博客字体,一般不要改 img/ 图像,一般不要改 js/ js文件,一般不要改 lang/ 语言文件 libs/Content.php 文章内容 libs/... 一般不要改 usr/ 另一个语言文件? 404.php 404界面 archive.php 整合 booklist.php 书单 cross.php 时光机 files.php 归档 functions.php 配置界面的东西 guestbook.php 留言板 index.php 首页 links.php 友链 page.php 文章页面整合 post.php 文章输出 color: 选填,不填默认为success(绿色),可选值: light:白色 info:蓝色 dark:深色 success:绿色 black:黑色 warning:黄色 primary:紫色 danger:红色 ``` ## 插件 解压包,不要做修改文件名上传至Typecho博客/usr/plugins文件夹内,后台启用! | 插件 | 介绍 | 地址 | | ------------------- | ------------------------------------------- | ------------------------------------------------------------------------ | | CodePrettify | Mac风格代码高亮 | [本地下载](https://www.muyu.love/usr/plugins/CodePrettify.tar.gz) | | tagshelper | 后台编辑文章时增加标签选择列表 | [本地下载](https://www.muyu.love/usr/plugins/tagshelper.tar.gz) | | ShortLinks | 把外部链接转换为内链接 | [本地下载](https://www.muyu.love/usr/plugins/ShortLinks.tar.gz) | | AliceStyle | 萌卜兔's 美化插件 | [本地下载](https://www.muyu.love/usr/plugins/AliceStyle.tar.gz) | | CommentFilter | 评论过滤器 | [本地下载](https://www.muyu.love/usr/plugins/CommentFilter.tar.gz) | | CommentPush | 评论通知推送多服务 | [本地下载](https://www.muyu.love/usr/plugins/CommentPush.tar.gz) | | EditorMD | Markdown 编辑器 Editor.md | [本地下载](https://www.muyu.love/usr/plugins/EditorMD.tar.gz) | | MarkdownParse | 更快、更强的 Markdown 解析插件 | [本地下载](https://www.muyu.love/usr/plugins/MarkdownParse.tar.gz) | | PartiallyPassword | 文章部分加密 | [本地下载](https://www.muyu.love/usr/plugins/PartiallyPassword.tar.gz) | | 权限狗 | 修改注册时默认用户组 | [本地下载](https://www.muyu.love/usr/plugins/Rdog.tar.gz) | | ServerStatus | Typecho服务器状态插件 | [本地下载](https://www.muyu.love/usr/plugins/ServerStatus.tar.gz) | | UserAgent | 显示评论人使用的操作系统和浏览器信息 | [本地下载](https://www.muyu.love/usr/plugins/UserAgent.tar.gz) | | WeTypecho插件 | 微信QQ小程序通用WeTypechoAPI接口插件 | [本地下载](https://www.muyu.love/usr/plugins/WeTypecho.tar.gz) | | WowScroll | 一款基于wow.js的元素初次加载动画插件 | [本地下载](https://www.muyu.love/usr/plugins/WowScroll.tar.gz) | | Access | 获取访客信息,生成统计图表 | [本地下载](https://www.muyu.love/usr/plugins/Access.tar.gz) | | Live2D | 一款基于爆胎看板娘js的插件 | [本地下载](https://www.muyu.love/usr/plugins/Live2D.tar.gz) | | SuVideo | Su Video一款适配typecho所有主题的影视插件 | [本地下载](https://www.muyu.love/usr/plugins/SuVideo.tar.gz) | | cosUploadV5 | cosV5--for Typecho 使用cosV5版本sdk | [本地下载](https://www.muyu.love/usr/plugins/cosUploadV5.tar.gz) | | | | | [/hide] # 2.0 [hide]在美化之前,要清楚Handsome主题的文件架构 [collapse status="false" title="结构"]component/comments.php 评论区 component/footer.php 底部版权、音乐播放器之类 component/header.php 页面头,没啥要改的 component/headnav.php 顶部导航 component/say.php 时光机动态 component/sidebar.php 右侧栏目 component/third_party_comments.php 3.3.0新增,第三方评论 css/ 博客CSS,一般不要改 fonts/ 博客字体,一般不要改 img/ 图像,一般不要改 js/ js文件,一般不要改 lang/ 语言文件 libs/Content.php 文章内容 libs/... 一般不要改 usr/ 另一个语言文件? 404.php 404界面 archive.php 整合 booklist.php 书单 cross.php 时光机 files.php 归档 functions.php 配置界面的东西 guestbook.php 留言板 index.php 首页 links.php 友链 page.php 文章页面整合 post.php 文章输出 color: 选填,不填默认为success(绿色),可选值: light:白色 info:蓝色 dark:深色 success:绿色 black:黑色 warning:黄色 primary:紫色 danger:红色[/collapse] --- ### 添加GZIP压缩 [collapse status="false" title="Gzip压缩"]在config.inc.php内加入代码 ``` /** 开启gzip压缩 */ ob_start('ob_gzhandler'); ``` [/collapse] ### 自定义后台路径 [collapse status="false" title="自定义后台路径"] 1.将`Typecho`程序根目录中的后台文件夹`"admin"`改名 2、修改根目录文件`"config.inc.php" [/collapse] ### 使Typecho支持emoji???? [collapse status="false" title="Emoji"]这里编辑收缩框内容执行`sql`语句来修改表的编码,将 `Typecho` 目录下的`config.inc.php` 配置文件中数据库定义参数中的 `charset` 后的改为 `utf8mb4` ``` alter table typecho_comments convert to character set utf8mb4 collate utf8mb4_unicode_ci; alter table typecho_contents convert to character set utf8mb4 collate utf8mb4_unicode_ci; alter table typecho_fields convert to character set utf8mb4 collate utf8mb4_unicode_ci; alter table typecho_metas convert to character set utf8mb4 collate utf8mb4_unicode_ci; alter table typecho_options convert to character set utf8mb4 collate utf8mb4_unicode_ci; alter table typecho_relationships convert to character set utf8mb4 collate utf8mb4_unicode_ci; alter table typecho_users convert to character set utf8mb4 collate utf8mb4_unicode_ci; ``` [/collapse] ### 每日新闻 自动更新 [collapse status="false" title="每日新闻"] 首先去 https://alapi.cn/ 注册一个账号,会生成一个Token,然后将token粘贴到下面 在根目录创建一个60s的文件夹 ``` ``` 将代码粘贴上去之后 新建一个页面,然后引入就行了 ``` ``` [/collapse] ### 独立页面嵌入网页 [collapse status="false" title="嵌入页面"]将自己喜欢的页面引用到自己的网站上,可以引用打赏页面 ``` ``` [/collapse] --- [scode type="blue" size=""]该修改项位于Handsome主题后台-外观-设置外观-开发者设置-自定义CSS处[/scode] ## 自定义CSS ### 文章标题居中 [collapse status="false" title="文章标题居中"] ``` /*文章标题居中*/ header.bg-light.lter.wrapper-md { text-align: center; } ``` [/collapse] ### 首页标题文字居中 [collapse status="false" title="首页标题文字居中"] ``` /*首页标题文字居中*/ .m-t-none.text-ellipsis.index-post-title.text-title { text-align:center !important; } ``` [/collapse] ### 左上角博客LOGO/博客名称的扫光效果 [collapse status="false" title="左上角博客LOGO/博客名称的扫光效果"] 左上角博客LOGO/博客名称的扫光效果 ``` /* logo扫光 */ .navbar-brand{position:relative;overflow:hidden;margin: 0px 0 0 0px;}.navbar-brand:before{content:""; position: absolute; left: -665px; top: -460px; width: 200px; height: 15px; background-color: rgba(255,255,255,.5); -webkit-transform: rotate(-45deg); -moz-transform: rotate(-45deg); -ms-transform: rotate(-45deg); -o-transform: rotate(-45deg); transform: rotate(-45deg); -webkit-animation: searchLights 6s ease-in 0s infinite; -o-animation: searchLights 6s ease-in 0s infinite; animation: searchLights 6s ease-in 0s infinite;}@-moz-keyframes searchLights{50%{left: -100px; top: 0;} 65%{left: 120px; top: 100px;}}@keyframes searchLights{40%{left: -100px; top: 0;} 60%{left: 120px; top: 100px;} 80%{left: -100px; top: 0px;}} ``` [/collapse] ### 左上角博主信息羽毛背景 [collapse status="false" title="左上角博主信息羽毛背景"] ``` /* 羽毛_css */ .dropdown.wrapper { background:url(https://地址/yumao.webp) right bottom no-repeat; } ``` [/collapse] ### 鼠标路过头像时放大并旋转 [collapse status="false" title="鼠标路过头像时放大并旋转"] ``` /* 鼠标经过头像旋转放大 */ .img-circle { border-radius: 50%; animation: light 4s ease-in-out infinite; transition: all 0.5s; } .img-circle:hover { transform: scale(1.15) rotate(720deg); } @keyframes light { 0% { box-shadow: 0 0 4px #f00; } 25% { box-shadow: 0 0 16px #0f0; } 50% { box-shadow: 0 0 4px #00f; } 75% { box-shadow: 0 0 16px #0f0; } 100% { box-shadow: 0 0 4px #f00; } } ``` [/collapse] ### 首页文章图片获取焦点放大 [collapse status="false" title="首页文章图片获取焦点放大"] ``` /* 首页文章图片获取焦点放大 */ .item-thumb{ cursor: pointer; transition: all 0.6s; } .item-thumb:hover{ transform: scale(1.05); } .item-thumb-small{ cursor: pointer; transition: all 0.6s; } .item-thumb-small:hover{ transform: scale(1.05); } ``` [/collapse] ### 时光机内圆形头像 [collapse status="false" title="时光机内圆形头像"] ``` /* 时光机圆形头像 */ .img-square {border-radius: 50%;} .list-group-item .thumb-sm .img-square {border-radius: 5px;} ``` [/collapse] ### 网站右侧滚动条样式 [collapse status="false" title="网站右侧滚动条样式"] ``` /* 美化网站右侧滚动条样式 */ /*定义滚动条高宽及背景 高宽分别对应横竖滚动条的尺寸*/ ::-webkit-scrollbar { width: 8px; height: 6px } /*定义滚动条轨道*/ ::-webkit-scrollbar-track { background-color: transparent; -webkit-border-radius: 2em; -moz-border-radius: 2em; border-radius: 2em } /*定义滑块 内阴影+圆角*/ ::-webkit-scrollbar-thumb { background-color: #949494; background-image: -webkit-linear-gradient(45deg,rgba(255,255,255,.4) 100%,transparent 100%,transparent 50%,rgba(255,255,255,.4) 50%,rgba(255,255,255,.4) 75%,transparent 75%,transparent); -webkit-border-radius: 2em; -moz-border-radius: 2em; border-radius: 2em } ``` [/collapse] ### 文章版式阴影化 [collapse status="false" title="文章版式阴影化"] ``` /* 首页文章版式阴影颜色 */ .panel{ box-shadow: 1px 1px 5px 5px rgba(26, 169, 255, 0.35); -moz-box-shadow: 1px 1px 5px 5px rgba(26, 169, 255, 0.35); } .panel:hover{ box-shadow: 1px 1px 5px 5px rgba(26, 169, 255, 0.35); -moz-box-shadow: 1px 1px 5px 5px rgba(26, 169, 255, 0.35); } .panel-small{ box-shadow: 1px 1px 5px 5px rgba(26, 169, 255, 0.35); -moz-box-shadow: 1px 1px 5px 5px rgba(26, 169, 255, 0.35); } .panel-small:hover{ box-shadow: 1px 1px 5px 5px rgba(26, 169, 255, 0.35); -moz-box-shadow: 1px 1px 5px 5px rgba(26, 169, 255, 0.35); } .app.container { box-shadow: 0 0 30px rgba(26, 169, 255, 0.35); } ``` [/collapse] ### 更改右侧列表导航栏三个图标颜色 [collapse status="false" title="更改右侧列表导航栏三个图标颜色"] ``` /* 右侧列表导航栏图标颜色 */ .sidebar-icon svg.feather.feather-thumbs-up{color: #ff0000;} .sidebar-icon svg.feather.feather-message-square{color:#495dc3;} .sidebar-icon svg.feather.feather-gift{color:#52DE97;} #post-content pre code { display:block; overflow-x:auto; position:relative; margin:0; padding-left:50px; } pre code { position:relative; display:block; overflow-x:auto; margin:4.4px 0.px .4px 1px; padding:0; max-height:500px; padding-left:3.5em } .img-square { transition: all 0.3s; } .img-square:hover { transform: rotate(360deg); } .glyphicon-fire { color: #ff0000; } .nav-tabs-alt .glyphicon-comment { color: #495dc3; } .glyphicon-transfer { color: #0e5458; } ``` [/collapse] ### 首页文章列表悬停上浮 [collapse status="false" title="首页文章列表悬停上浮"] ``` /*首页文章列表悬停上浮*/ .blog-post .panel:not(article) { transition: all 0.3s; } .blog-post .panel:not(article):hover { transform: translateY(-10px); box-shadow: 0 8px 10px rgba(73, 90, 47, 0.47); } ``` [/collapse] ### 赞赏按钮跳动 [collapse status="false" title="赞赏按钮跳动"] ``` /*赞赏按钮跳动*/ .btn-pay { animation: star 0.5s ease-in-out infinite alternate; } @keyframes star { from { transform: scale(1); } to { transform: scale(1.1); } } ``` [/collapse] ### 评论边框 [collapse status="false" title="评论边框"] ``` /*评论边框*/ .comment-parent { margin: 20px; padding: 20px; border-radius: 25px; border: 1px solid rgba(255,255,255,.3); } ``` [/collapse] ### 粗斜体上色 [collapse status="false" title="粗斜体上色"] ``` /* 粗斜体上色 */ strong{ color: #f26522; } em{ font-style: normal; color: #fcaf17; } ``` [/collapse] ### 首页文章添加圆角效果 [collapse status="false" title="首页文章添加圆角效果"] ``` /*首页文章版式圆角化*/ .panel{ border: none; border-radius: 15px; } .panel-small{ border: none; border-radius: 15px; } .item-thumb{ border-radius: 15px; } ``` [/collapse] ### 修改h1,h2标题背景颜色 [collapse status="false" title="修改h1,h2标题背景颜色"] ``` /*文章页h标签背景颜色修改*/ #post-content h1, #post-content h2 { background : linear-gradient(to bottom,transparent 60%,rgba(0,191,255,.3) 0) no-repeat } ``` [/collapse] ### 网站背景添加海浪背景 [collapse status="false" title="网站背景添加海浪背景"] ``` /* 海浪背景CSS部分 */ #wavesDIV{position: fixed;bottom: 0;width: 100%;display:block;height:20vh;background-color:rgb(125,165,191);animation: move-out 2s cubic-bezier(0,.98,.97,1) forwards;} .waves { position:relative; width: 100%; height:15vh; margin-top:-15vh; min-height:100px; max-height:150px; } .parallax > use { animation: move-forever 25s cubic-bezier(.55, .5, .45, .5) infinite; } .parallax > use:nth-child(1) { animation-delay: -2s; animation-duration: 7s; } .parallax > use:nth-child(2) { animation-delay: -3s; animation-duration: 10s; } .parallax > use:nth-child(3) { animation-delay: -4s; animation-duration: 13s; } .parallax > use:nth-child(4) { animation-delay: -5s; animation-duration: 20s; } @keyframes move-forever { 0% { transform: translate3d(-90px, 0, 0); } 100% { transform: translate3d(85px, 0, 0); } } @keyframes move-out { 0% { transform: translateY(400%); } 100% { transform: translateY(0%); } } ``` 将下列代码添加至后台`主题设置-开发者设置-自定义输出head 头部的HTML代码` ``` ``` [/collapse] ## 自定义JavaScripts [scode type="yellow" size=""]该修改项位于Handsome主题后台-外观-设置外观-开发者设置-自定义 JavaScript处[/scode] ### 网页文字禁止复制 [collapse status="false" title="网页文字禁止复制"] ``` ``` [/collapse] ### 复制成功提示 [collapse status="false" title="复制成功提示"] ``` /* 复制成功提示代码开始 */ kaygb_copy();function kaygb_copy(){$(document).ready(function(){$("body").bind('copy',function(e){hellolayer()})});var sitesurl=window.location.href;function hellolayer(){ $.message({ message: "尊重原创,转载请注明出处! 本文作者:Dawn原文链接:"+sitesurl, title: "复制成功", type: "warning", autoHide: !1, time: "5000" }) }} /* 复制成功提示代码结束 */ ``` [/collapse] ### 复制文章带有文章版权 [collapse status="false" title="复制文章带有文章版权"]复制下面代码到 `handsome主题>设置外观>开发者设置>自定义 JavaScript` ``` /* 复制文章自动带版权开始 */ document.body.addEventListener('copy', function (e) { if (window.getSelection().toString() && window.getSelection().toString().length > 42) { setClipboardText(e); notie({ type: 'info', text: '商业转载请联系作者获得授权,非商业转载请注明出处,谢谢合作。', autoHide: true }) } }); function setClipboardText(event) { var clipboardData = event.clipboardData || window.clipboardData; if (clipboardData) { event.preventDefault(); var htmlData = '' + '著作权归作者所有。' + '商业转载请联系作者获得授权,非商业转载请注明出处!' + '本博转载文章版权及解释权归原作者所有,博主只是勤劳的搬运工!' + '作者:Dawn' + '链接:' + window.location.href + '' + '来源:http://www.5k5b.com/' + window.getSelection().toString(); var textData = '' + '著作权归作者所有。\n' + '商业转载请联系作者获得授权,非商业转载请注明出处!\n' + '本博转载文章版权及解释权归原作者所有,博主只是勤劳的搬运工!\n' + '作者:Dawn' + '链接:' + window.location.href + '\n' + '来源:http://www.5k5b.com/\n\n' + window.getSelection().toString(); clipboardData.setData('text/html', htmlData); clipboardData.setData('text/plain',textData); } } /* 复制文章自动带版权结束 */ ``` [/collapse] ### 鼠标点击特效-爱心样式 [collapse status="false" title="鼠标点击特效-爱心样式"] ``` //鼠标点击出现爱心特效 (function(window,document,undefined){ var hearts = []; window.requestAnimationFrame = (function(){ return window.requestAnimationFrame || window.webkitRequestAnimationFrame || window.mozRequestAnimationFrame || window.oRequestAnimationFrame || window.msRequestAnimationFrame || function (callback){ setTimeout(callback,1000/60); } })(); init(); function init(){ css(".heart{width: 10px;height: 10px;position: fixed;background: #f00;transform: rotate(45deg);-webkit-transform: rotate(45deg);-moz-transform: rotate(45deg);}.heart:after,.heart:before{content: '';width: inherit;height: inherit;background: inherit;border-radius: 50%;-webkit-border-radius: 50%;-moz-border-radius: 50%;position: absolute;}.heart:after{top: -5px;}.heart:before{left: -5px;}"); attachEvent(); gameloop(); } function gameloop(){ for(var i=0;i" + document.referrer; }else{ return ""; }} $.message({ message: "为了网站的正常运行,请不要使用广告屏蔽插件,谢谢!" + kaygb_referrer(), title: "网站加载完成", type: "success", autoHide: !1, time: "3000" }) /* 网站加载完成提示结束 */ ``` [/collapse] ### 左上角网站FPS显示 [collapse status="false" title="左上角网站FPS显示"] ``` /* FPS显示 */ var console={}; console.log=function(){}; $('body').before(''); var showFPS = (function(){ var requestAnimationFrame = window.requestAnimationFrame || window.webkitRequestAnimationFrame || window.mozRequestAnimationFrame || window.oRequestAnimationFrame || window.msRequestAnimationFrame || function(callback) { window.setTimeout(callback, 1000/60); }; var e,pe,pid,fps,last,offset,step,appendFps; fps = 0; last = Date.now(); step = function(){ offset = Date.now() - last; fps += 1; if( offset >= 1000 ){ last += offset; appendFps(fps); fps = 0; } requestAnimationFrame( step ); }; appendFps = function(fps){ console.log(fps+'FPS'); $('#fps').html(fps+'FPS'); }; step(); })(); ``` [/collapse] [scode type="share" size=""]感谢各位大佬做出的贡献 [@青柠](https://blog.qninq.cn/) [@沐雨](https://www.muyu.love) [@小屁](https://www.xpblog.cn) [@小小的孩子们](https://www.xxhzm.cn/) [/scode] [/hide] 前言 因为是全网最新最全的美化记录,加之主题架构比较大,所以说不止于一个美化教程,共涉及到四个相关文章 PHP+Javascript实现滑动验证码 目前市面上做的好的拖动验证、用户行为验证有极验验证码、网易易盾验证等,这些第三方验证一般需要收费,本文给大家介绍一... OhMyWeChat微信聊天数据备份与年度数据报告工具 OhMyWeChat 是一款开源的微信备份与年度数据报告工具,旨在为用户提供一个全新的微信数据备份和分析体验。它允... 【最新】基于Github的图床插件 相信大家都有服务器内存或者带宽不够,无法存储图片的烦恼所以说今天给大家带来一款插件,完美图片存储解决问题插件简介下载地址 百度网盘资源失效检测api接口源码 写了一个简单的百度网盘是否有效的插件,可以检测分享的链接是否还有效。请求方法:?url=https://pan.b... 关于教程来源至网络,感谢各位大佬的教程贡献,文章末尾会引出原文链接1.0此处内容需要评论回复后(审核通过)方可阅读。2.0此处内容需要评论回复后(审核通过)方可阅读。 最后修改:2024 年 03 月 23 日 © 允许规范转载 打赏 赞赏作者 支付宝微信 赞 如果觉得我的文章对你有用,请随意赞赏 文章引用 反向引用 Loading... 暂未引用其他文章 暂未被其它文章引用 下一篇 上一篇 97 条评论 Loading... 看透一切的男士 January 21st, 2026 at 08:08 am 看咯看 回复 看透一切的匿名人士 October 18th, 2025 at 02:36 pm Look look 回复 潜心学习的女士 September 29th, 2025 at 12:07 am 我看看 回复 挺胸的打工人 September 16th, 2025 at 11:23 pm 学习 回复 XY April 6th, 2025 at 02:54 pm 感谢大佬分享 回复 aceu March 15th, 2025 at 10:35 pm 让我看看! 回复 天然 March 9th, 2025 at 11:33 am 学习一下 回复 骄傲的女孩 February 24th, 2025 at 09:13 pm 学习 回复 1 February 10th, 2025 at 10:15 am 学习一下 回复 潜心学习的打工人 January 20th, 2025 at 01:00 am 学习一下 回复 潜心学习的大黄 December 12th, 2024 at 09:32 am 看看 回复 gbr December 11th, 2024 at 09:13 am 学习 回复 Mike November 29th, 2024 at 10:36 am 学习 回复 北辰 November 26th, 2024 at 09:17 pm 学习一下 回复 小有名气的男士 November 25th, 2024 at 09:02 am 看看 回复 大名鼎鼎的道士 November 19th, 2024 at 03:08 pm 让我康康! 回复 江河三千里 November 17th, 2024 at 08:27 pm 想学习学习 回复 Ara November 8th, 2024 at 06:01 pm 看看 回复 老六 October 28th, 2024 at 05:02 pm 看看 回复 老六 October 27th, 2024 at 10:45 pm 看看 回复 倒立金枪鱼 October 15th, 2024 at 10:12 am 看看 回复 挺胸的女士 October 9th, 2024 at 03:08 pm 看看 回复 躲闪的道士 October 5th, 2024 at 04:22 pm 看看 回复 知名的贫僧 October 5th, 2024 at 10:02 am 看看 回复 ssui October 4th, 2024 at 02:56 pm 开吧 回复 setaria October 4th, 2024 at 02:55 pm 让我看康 回复 小有名气的女孩 October 1st, 2024 at 11:41 am SMWY 回复 Egon879 September 16th, 2024 at 01:42 pm 看看! 回复 知名的女孩 September 14th, 2024 at 03:13 pm 看看 回复 迟博勋 August 23rd, 2024 at 08:33 pm 看看 回复 迟博勋 August 22nd, 2024 at 05:24 pm 看看 回复 迟博勋 August 22nd, 2024 at 05:24 pm 看看 回复 lucy August 12th, 2024 at 12:59 pm 我看看 我看看 我看看 回复 lioil May 21st, 2024 at 11:35 pm 看看 回复 静离 May 1st, 2023 at 01:52 pm 回复 澪度 March 2nd, 2023 at 10:44 pm 让我看看 回复 叶某禁止狗叫 February 25th, 2023 at 08:42 pm look一下 回复 潜心学习的贫僧 February 22nd, 2023 at 08:30 pm 1 回复 bboy February 21st, 2023 at 11:53 am 慷慨୧(๑•̀⌄•́๑)૭ 回复 苏 February 20th, 2023 at 05:30 pm 支持 回复 知名的男孩 February 18th, 2023 at 05:01 pm 谢谢分享,让我看看 回复 看透一切的匿名人士 February 17th, 2023 at 01:09 am 感谢分享 回复 aj February 15th, 2023 at 05:35 pm 啊 回复 tu February 12th, 2023 at 04:43 pm 来了 回复 aj February 15th, 2023 at 05:34 pm @tu lail 回复 han February 9th, 2023 at 04:18 pm 看一下 回复 圆弧 February 5th, 2023 at 09:56 pm 看一下 回复 大名鼎鼎的匿名人士 February 5th, 2023 at 04:38 pm 我记住你IP了:127.0.0.1 ,马上打死你 回复 骄傲的打工人 February 4th, 2023 at 11:15 pm 让我看看 回复 ydl February 1st, 2023 at 02:44 pm 6的 回复 sun January 31st, 2023 at 08:44 pm 不忘初心,免费分享,不喜勿喷 回复 Reiice January 25th, 2023 at 04:30 pm 看看 回复 战东海 January 18th, 2023 at 10:13 am 看看 回复 jjxx January 17th, 2023 at 11:33 pm 666 回复 bill January 17th, 2023 at 08:21 pm 学习下 回复 Rose January 17th, 2023 at 06:34 pm 看看 回复 刚下飞机的学生 January 17th, 2023 at 04:15 pm |´・ω・)ノ 回复 Recall January 16th, 2023 at 11:49 pm 感谢分享 回复 ww January 16th, 2023 at 07:47 pm 让我康康 回复 ZhangZ January 16th, 2023 at 12:52 pm can can need 回复 CMuidar January 16th, 2023 at 12:48 pm 我要地址,为什么 回复 骄傲的人士 January 16th, 2023 at 12:37 pm 让我康康!OωO 回复 路过的陌生人 January 16th, 2023 at 11:34 am 让我看看 回复 wsb January 16th, 2023 at 09:59 am 让我看看 回复 红叶 January 15th, 2023 at 09:04 pm 看看 回复 橘生淮北 January 15th, 2023 at 08:30 pm 自豪地来自看看 回复 MySQL January 15th, 2023 at 07:42 pm 学习一下 回复 潜心学习的女士 January 15th, 2023 at 06:30 pm kanyixia 回复 MoyuqL January 15th, 2023 at 06:08 pm look一下啦 回复 雨停之後 January 15th, 2023 at 06:03 pm 看看地址呀 回复 pony January 15th, 2023 at 05:46 pm 爸爸你好 回复 PengHong January 15th, 2023 at 03:05 pm 看看在说。。。 回复 我鬼知道吖~ January 15th, 2023 at 02:45 pm 来让我康康 回复 不知名的男孩 January 15th, 2023 at 02:36 pm 666 回复 倾丞 January 15th, 2023 at 01:50 pm 该评论仅登录用户及评论双方可见 回复 666 January 15th, 2023 at 01:49 pm 来大佬博客学习一下 回复 潜心学习的打工人 January 15th, 2023 at 01:48 pm 来看看 回复 水稻本尊 January 15th, 2023 at 01:31 pm 学习一下 ! 回复 鹿久 January 15th, 2023 at 01:06 pm 闻讯而来~ 回复 Angelwized January 15th, 2023 at 01:06 pm 学习一下 回复 超耐磨水笔 January 15th, 2023 at 01:06 pm 互访 回复 die January 15th, 2023 at 01:05 pm can can need 回复 a'ゞ 囍楽. January 15th, 2023 at 01:04 pm OωO 回复 小宇 January 15th, 2023 at 12:57 pm 快让我看看是啥好东西 回复 小文 January 15th, 2023 at 12:52 pm 看一下看一下⌇●﹏●⌇ 回复 allen January 15th, 2023 at 12:51 pm 3 回复 亿灵 January 15th, 2023 at 12:50 pm 6666777 回复 小苹果 January 15th, 2023 at 12:47 pm 666 回复 问问 January 15th, 2023 at 12:47 pm 看看 回复 mm January 15th, 2023 at 12:43 pm 看看 回复 帅比 January 15th, 2023 at 12:42 pm 什么。这是什么 回复 陶小桃Blog January 15th, 2023 at 12:15 pm 瞅一眼 回复 wuuu January 15th, 2023 at 11:13 am 糖糖果 回复 网友 January 15th, 2023 at 11:10 am 看看 回复 小稚 January 15th, 2023 at 02:38 am 瞅瞅 回复 七月 January 14th, 2023 at 10:31 pm (╯°A°)╯︵○○○ 回复 西瓜撞地球 January 14th, 2023 at 04:27 pm 这是加密了么 回复 发表评论 取消回复 使用cookie技术保留您的个人信息以便您下次快速评论,继续评论表示您已同意该条款 评论 * 私密评论 名称 * 🎲 邮箱 * 地址 发表评论 提交中...
97 条评论
看咯看
Look look
我看看
学习
感谢大佬分享
让我看看!
学习一下
学习
学习一下
学习一下
看看
学习
学习
学习一下
看看
让我康康!
想学习学习
看看
看看
看看
看看
看看
看看
看看
开吧
让我看康
SMWY
看看!
看看
看看
看看
看看
我看看 我看看 我看看
看看
让我看看
look一下
1
慷慨୧(๑•̀⌄•́๑)૭
支持
谢谢分享,让我看看
感谢分享
啊
来了
lail
看一下
看一下
我记住你IP了:127.0.0.1 ,马上打死你
让我看看
6的
不忘初心,免费分享,不喜勿喷
看看
看看
666
学习下
看看
|´・ω・)ノ
感谢分享
让我康康
can can need
我要地址,为什么
让我康康!OωO
让我看看
让我看看
看看
自豪地来自看看
学习一下
kanyixia
look一下啦
看看地址呀
爸爸你好
看看在说。。。
来让我康康
666
来大佬博客学习一下
来看看
学习一下
!
闻讯而来~
学习一下
互访
can can need
OωO
快让我看看是啥好东西
看一下看一下⌇●﹏●⌇
3
6666777
666
看看
看看
什么。这是什么
瞅一眼
糖糖果
看看
瞅瞅
(╯°A°)╯︵○○○
这是加密了么